The Most Extensive Integration between WooCommerce and Stripe Checkout
Replace WooCommerce checkout with Stripe Checkout.SA Hosted Checkout for WooCommerce, a plugin developed to improve your online store’s revenues by giving more confidence to the customers to checkout. It effortlessly connects your WooCommerce store with Stripe Checkout bypassing the WooCommerce checkout completely.


Our plugins are trusted by thousands of websites throughout the world.
SA Hosted Checkout for WooCommerce
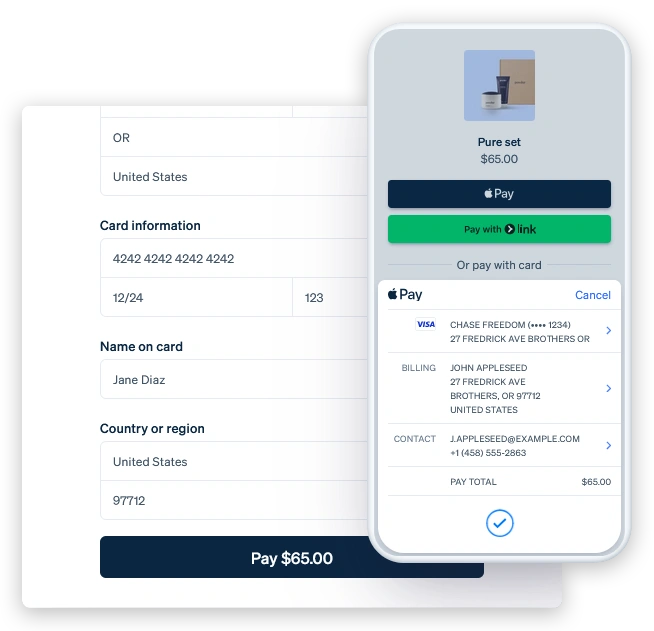
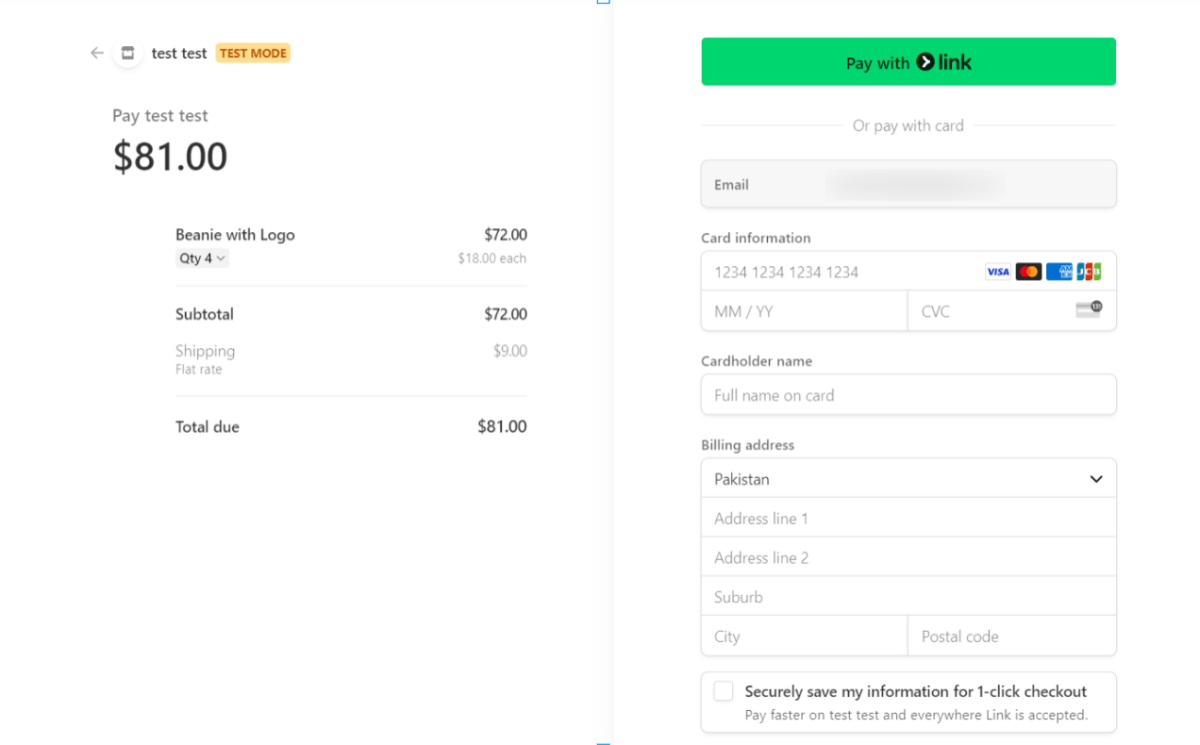
SA Hosted Checkout for WooCommerce is a WordPress plugin specifically created to integrate WooCommerce with Stripe Checkout. The plugin makes it possible to replace WooCommerce Checkout with Stripe Checkout in a few clicks. Stripe Checkout is a complete checkout system hosted securely on Stripe and comes with state of the art checkout features.

WooCommerce


Stripe Checkout
Stripe Checkout comes with:

1-click payment using Link
Real-time card validation
Address auto-complete
Conversion Optimized
Payment method reuse
Third-party autofill
Built for Global Customers
Ready for all devices
What ‘SA Hosted Checkout for WooCommerce’ has to offer


Replace WooCommerce Checkout with Stripe Checkout
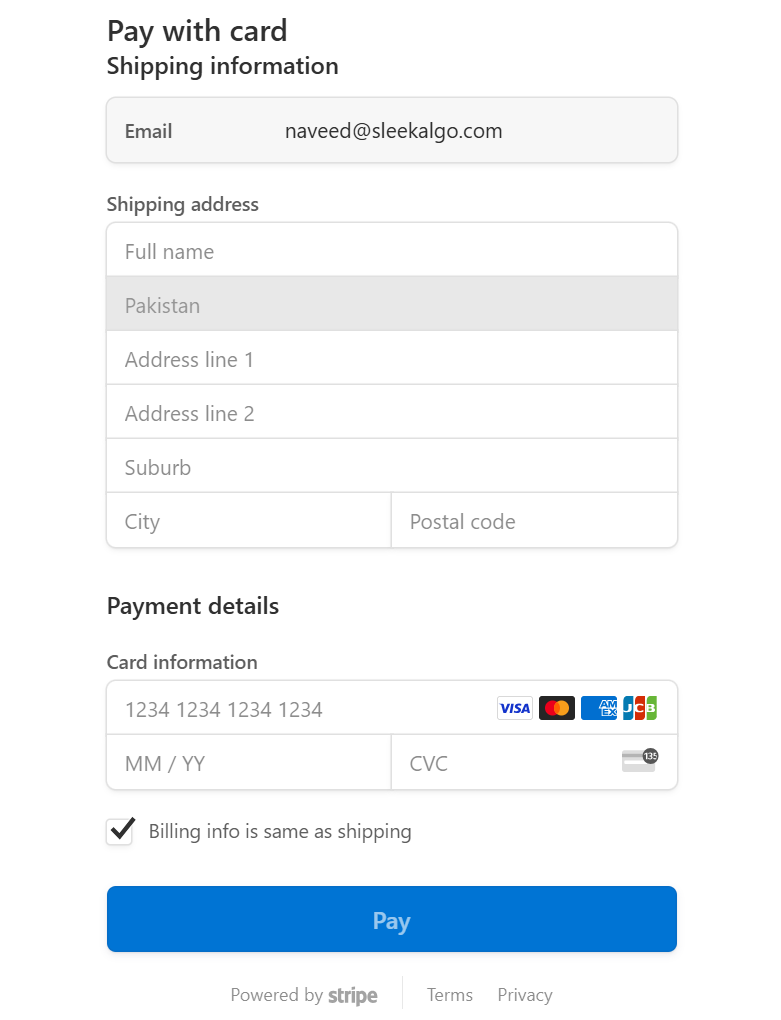
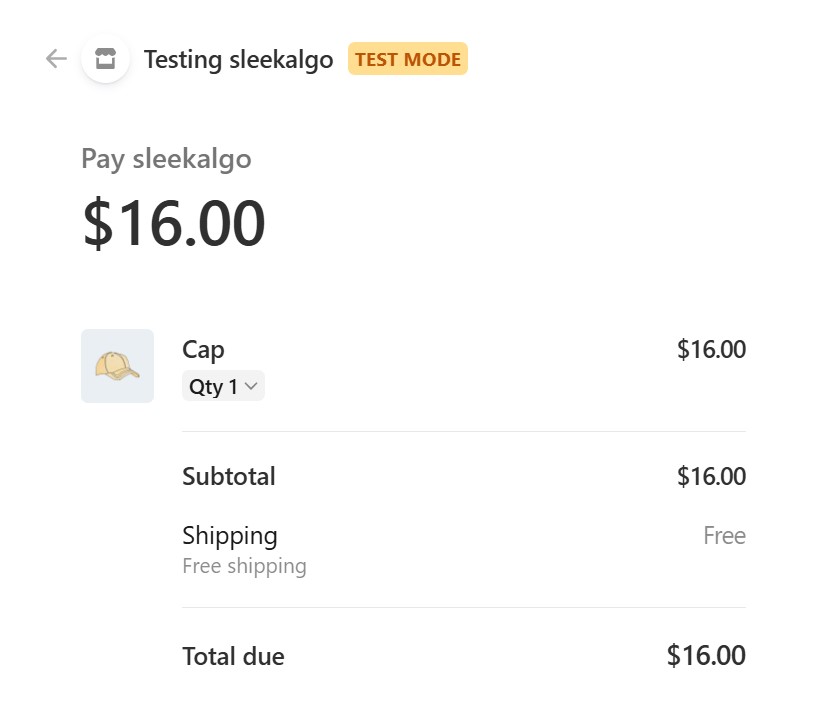
After activating the plugin, you will initially be redirected to the default WooCommerce checkout page when completing a purchase on your site. Once the plugin is successfully enabled, you will bypass the default WooCommerce checkout page entirely and be taken directly to the Stripe checkout page.
High Performance Order Storage Support
The plugin comes with built-in support for the WooCommerce High Performance Order Storage (HPOS) update.
Enable or Disable Phone Number Field
This option allows you to enable a phone number field on the Stripe checkout page, where customers can enter their contact information to complete their order.
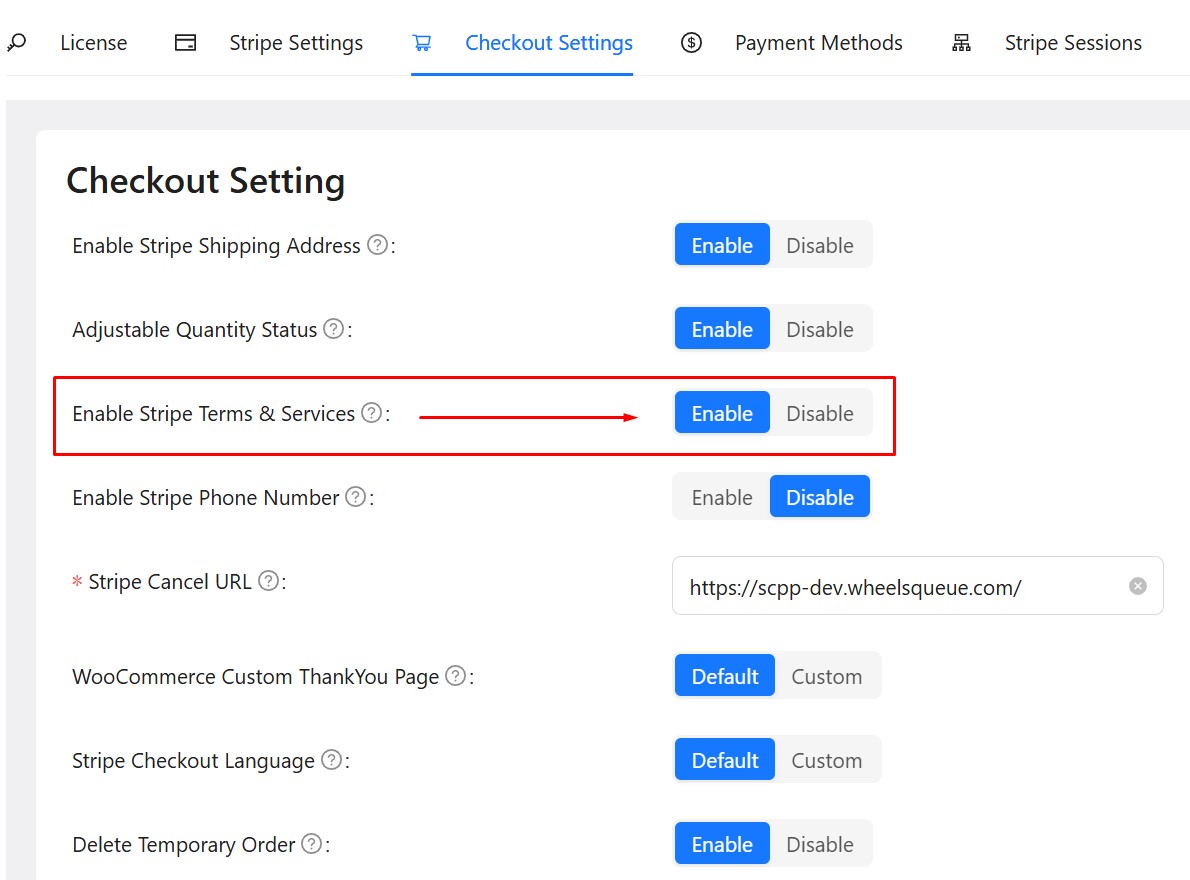
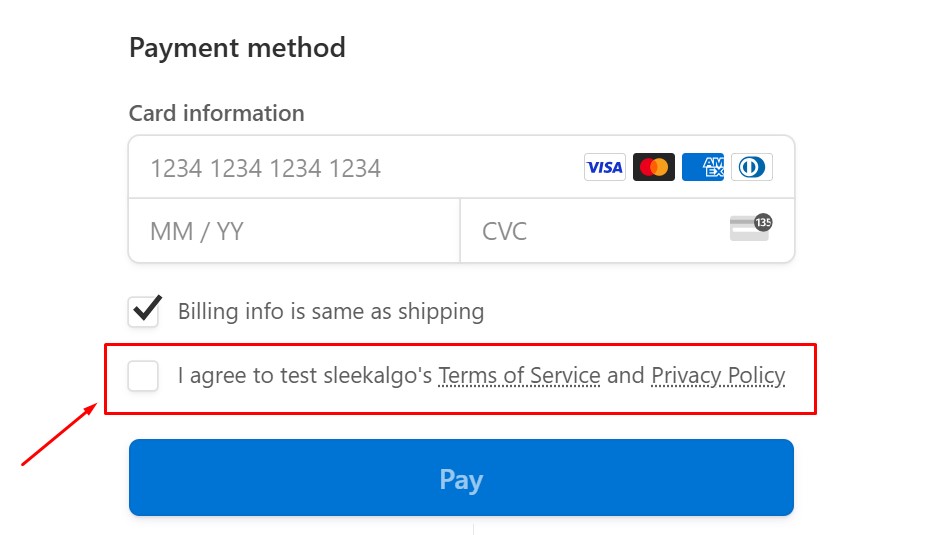
Enable or Disable Terms and Services Checkbox
This option lets you add a Terms and Conditions checkbox to the Stripe checkout page, requiring customers to agree to your terms before proceeding with their purchase.
Set a Cancellation URL
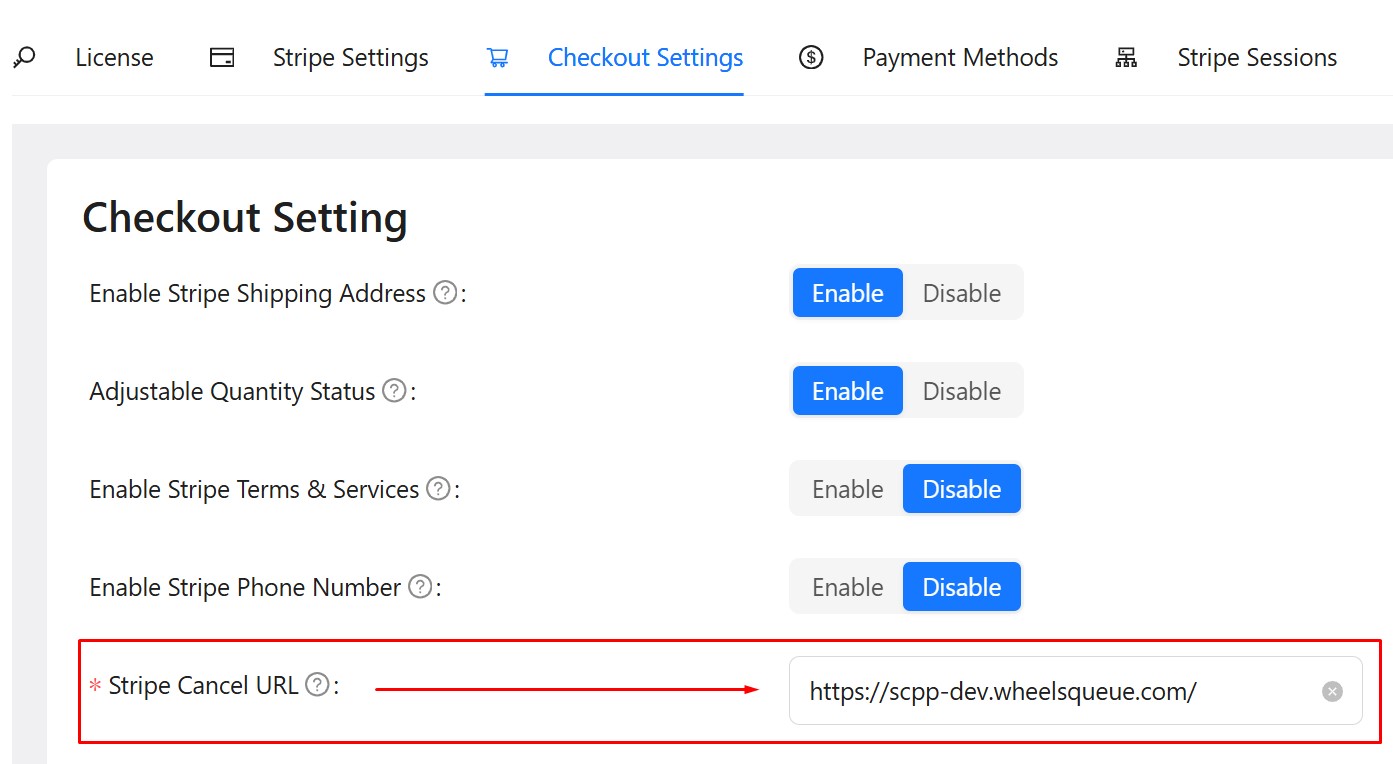
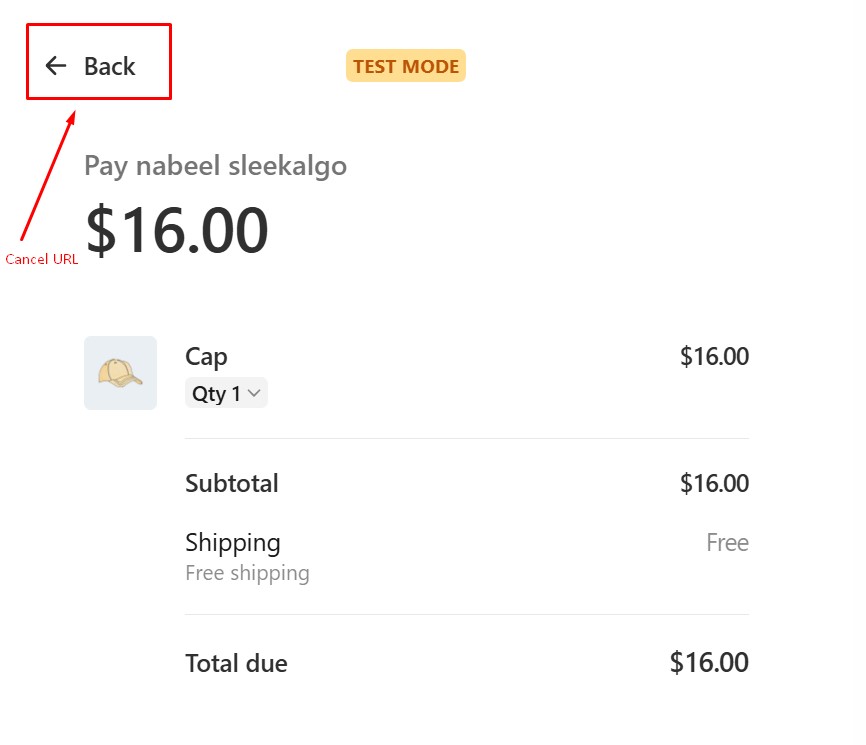
This option provides a field where you can specify a URL for a landing page. This page will be shown if a customer navigates away from or cancels the Stripe checkout process.
Replace WooCommerce Checkout with Stripe Checkout
After activating the plugin, you will initially be redirected to the default WooCommerce checkout page when completing a purchase on your site. Once the plugin is successfully enabled, you will bypass the default WooCommerce checkout page entirely and be taken directly to the Stripe checkout page.
High Performance Order Storage Support
The plugin comes with built-in support for the WooCommerce High Performance Order Storage (HPOS) update.

Support for WooCommerce Coupon Codes and Discounts
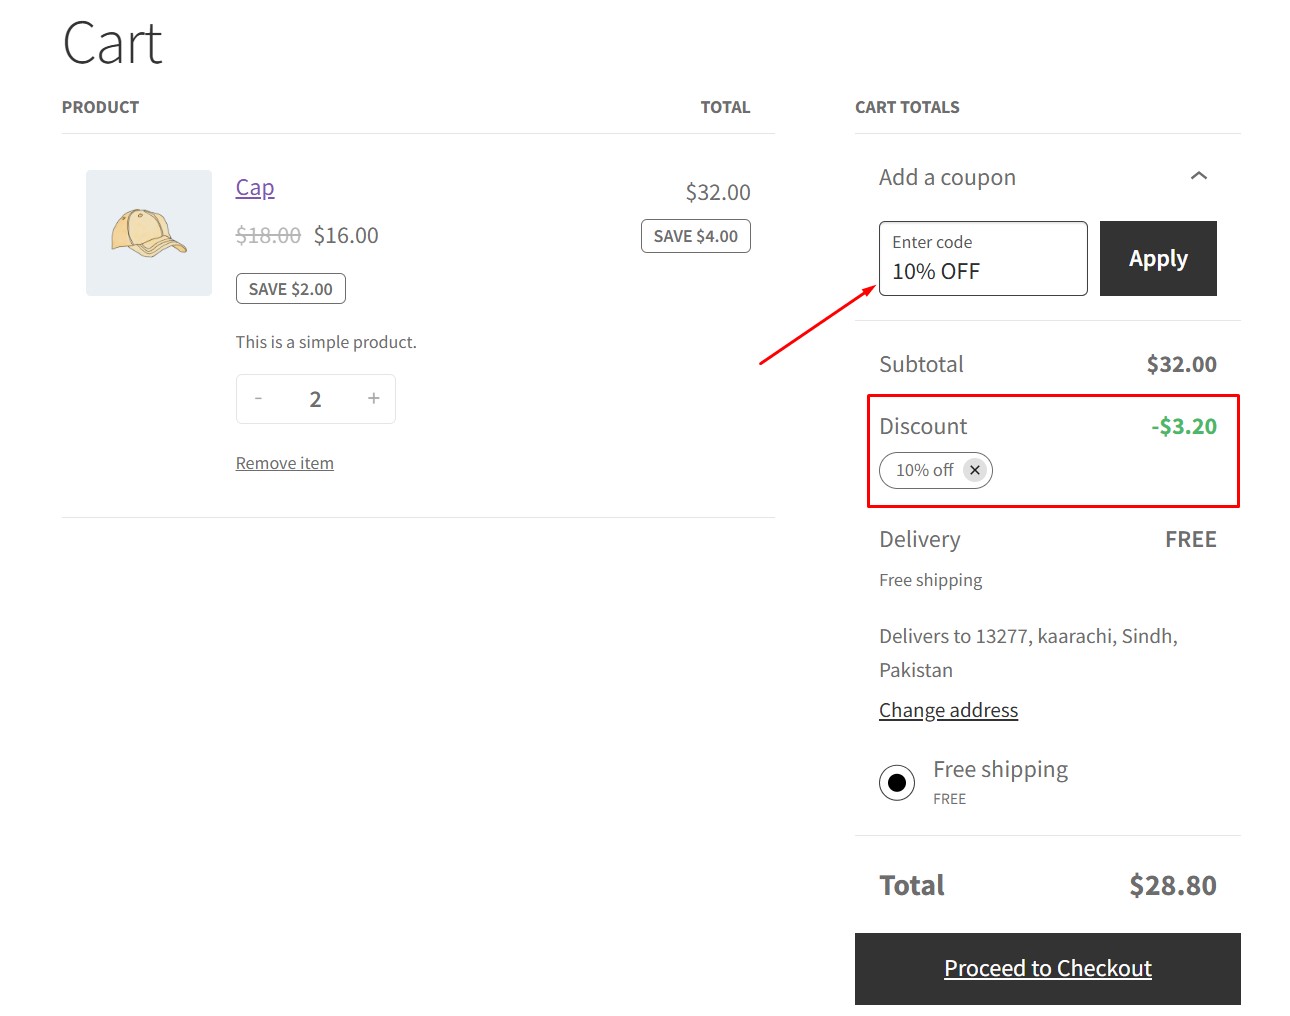
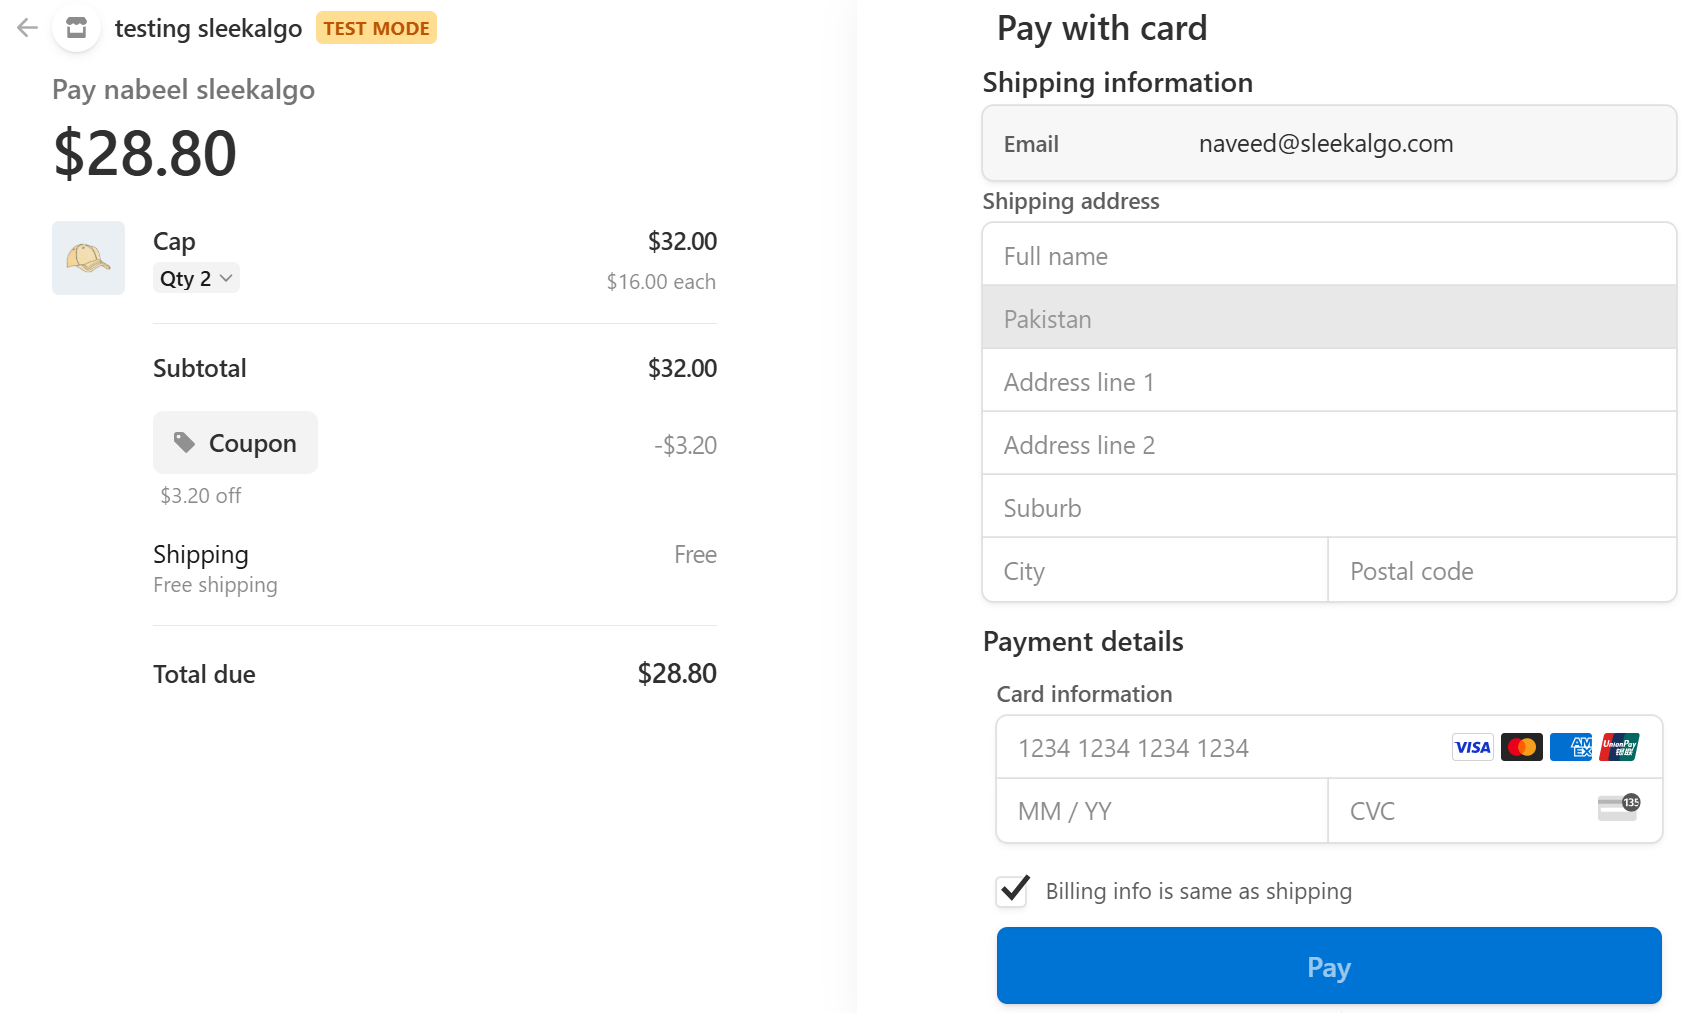
The premium version of the SA Hosted Checkout for WooCommerce plugin natively supports WooCommerce coupon codes and discounts, meaning any discounts or coupons applied to the cart, products, or shipping will automatically be reflected in the Stripe Checkout.
Support for Custom Payment Methods
This plugin allows you to choose from default or custom payment methods, depending on your needs. By default, the plugin is set to use Stripe as the payment method. To switch to custom payment options, click on the “Custom” tab to view the available payment methods integrated with the plugin.
Add Custom Fields to Stripe Checkout
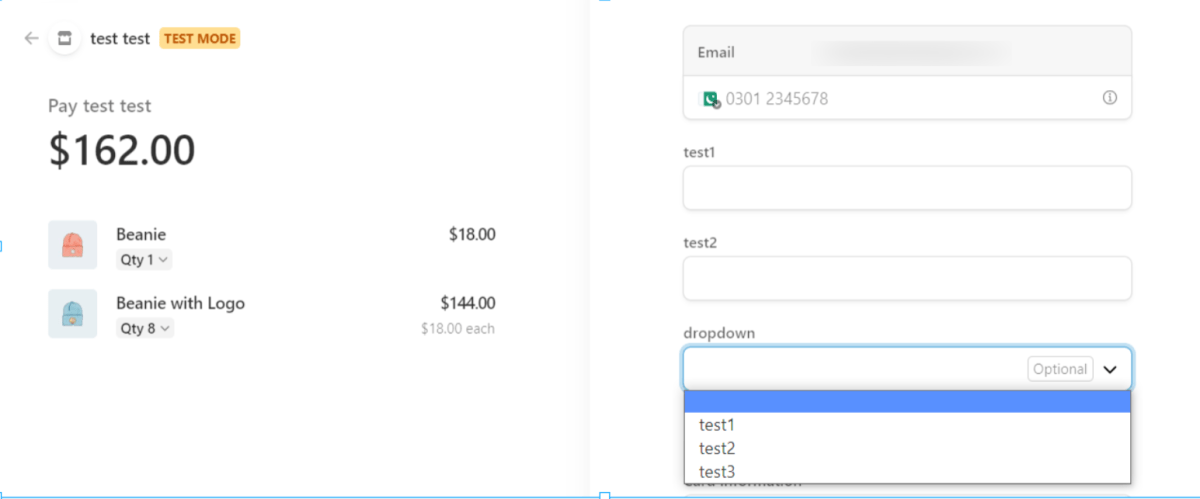
Stripe Custom Fields offer a set of customizable fields that you can add to your Stripe checkout page, enhancing the user experience with more detailed and engaging options.
Choose Stripe Checkout Language
By default, WooCommerce uses English for the checkout page, and this language will be pre-selected in the plugin’s settings. If you wish to use a different language, simply click the “Custom” tab, where you can select your preferred language from a dropdown for the Stripe checkout page.
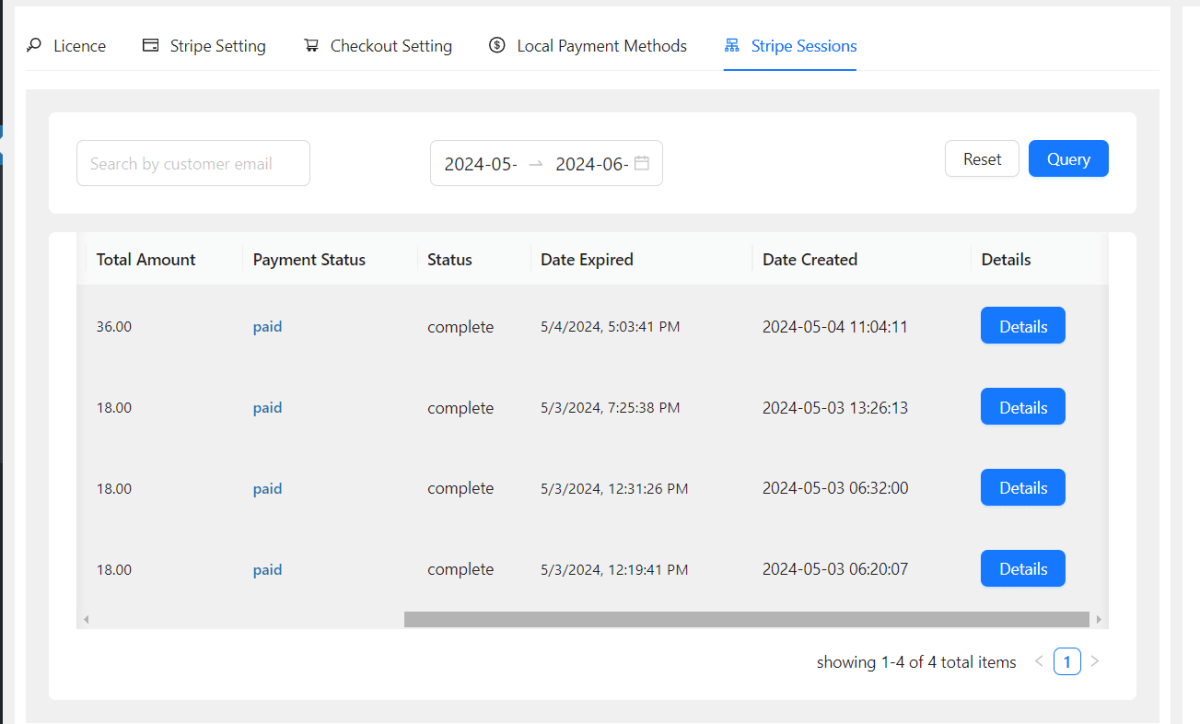
Stripe Checkout Sessions Information
Stripe Sessions provide a detailed view of all checkout sessions created through Stripe, including both paid and unpaid sessions. You can access customer and order details for greater insight into each transaction.
Custom Shipping Text on Stripe Checkout
The premium version of the SA Hosted Checkout for WooCommerce plugin enables the admin to add custom text that will appear after the shipping address fields on the Stripe checkout page, making it easy to display shipping-related messages or notes to customers.
Enable or Disable Phone Number Field
This option allows you to enable a phone number field on the Stripe checkout page, where customers can enter their contact information to complete their order.
Custom Thank You page
WooCommerce provides a default thank you page after an order is placed. To use this page, simply select the “Default” tab. If you want to display a custom thank you page for your customers, click on the “Custom” tab.
Enable or Disable Terms and Services Checkbox
This option lets you add a Terms and Conditions checkbox to the Stripe checkout page, requiring customers to agree to your terms before proceeding with their purchase.
Custom Terms and Services Text
The premium version of the SA Hosted Checkout for WooCommerce plugin allows the admin to add custom text for the Terms and Conditions section on the Stripe checkout page, making it easy to display your policies directly to customers.
Set a Cancellation URL
This option provides a field where you can specify a URL for a landing page. This page will be shown if a customer navigates away from or cancels the Stripe checkout process.
Custom Text Before and After Submit Button
The premium version of the SA Hosted Checkout for WooCommerce plugin enables the admin to add custom text before and after the Submit button on the Stripe checkout page. This feature is useful for displaying important messages related to payments, order processing, or shipping.
Adjustable Quantity on Stripe Checkout
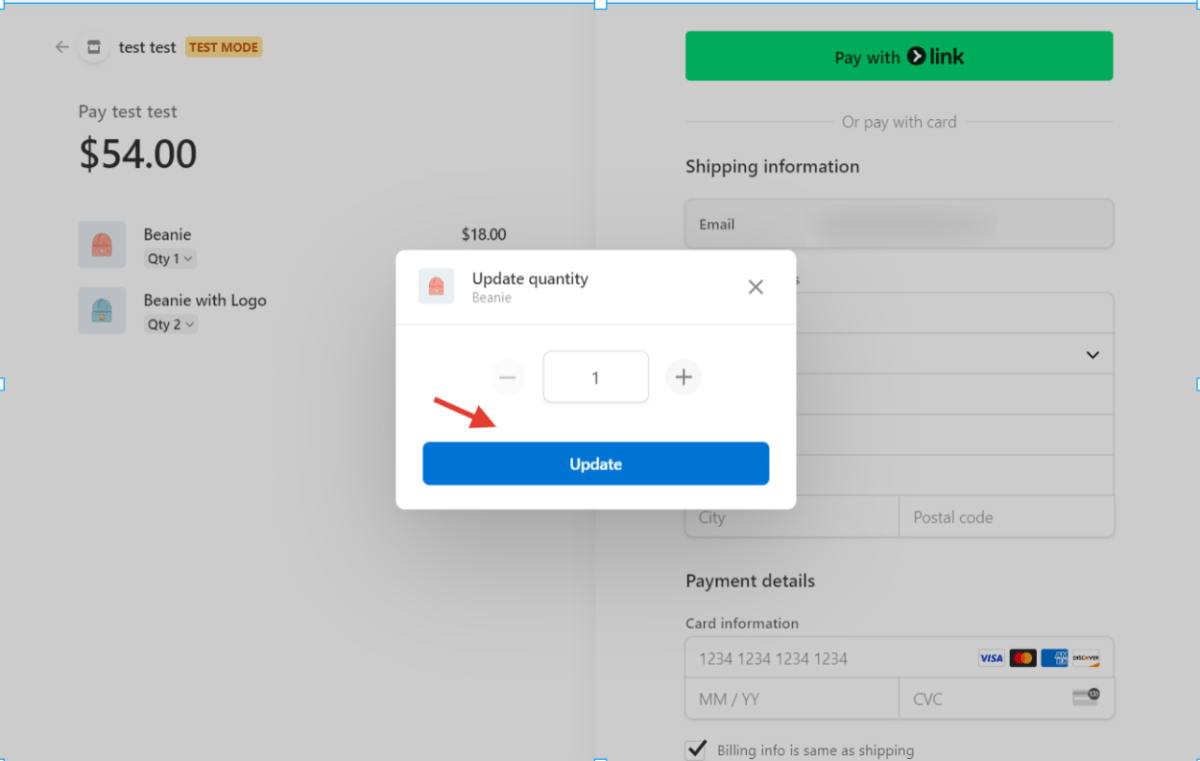
This option allows customers to adjust the quantity of products directly on the Stripe checkout page, without returning to the cart. When enabled, a ‘Qty’ dropdown will appear under each product, allowing customers to select the desired quantity, which can be updated by clicking “Update” in the popup.
Admins Test Mode
Admin Test Mode enables only website administrators to activate a test mode, allowing them to process test orders on the site using test Stripe payments.
Premium Support by Sleek Algo Technical Team
Buying the premium version provides you with access to our premium email support. All the emails and tickets are addressed on priority by qualified and seasoned professionals. The team can help you set up the plugin or even advise on alternatives if the plugin does not support the functionality you are looking for.
14 Days Money Back Guarantee
Sleek Algo provides 14 days money back guarantee on all their premium products. If any of the functionality promised by the plugin does not work well on your particular web store and our technical support team is unable to fix the issue for you, we will be happy to give you a complete refund with no questions asked.
Pricing
Buy the fully loaded Premium Version
Secure checkout by Freemius Inc (US)

14 Days Money Back Guarantee
No Questions Asked

99% Customer Satisfaction Rating

Secure Checkout by Freemius
Secure HTTPS

PCI Compliant Checkout
Freemius Hosted

SA Hosted Checkout FAQ
Once everything is ready and the plugin is enabled, any customer who clicks a Checkout link or button from anywhere of your website, is redirected to Stripe Checkout. Therefore, you don”t need to worry about how your WooCommerce checkout works or looks because no customer will land on that after enabling this plugin.
Get your Test/Live Stripe keys and webhook keys from the Stripe account, enter those keys in the Stripe Settings tab and Click on the Enable button.
In order to provide custom payment methods on your website, please purchase the premium version of the plugin.
The premium version of Stripe Checkout Plug and Play provides options to add custom text, number and dropdown fields for better customization.
The premium version offers you access to Stripe Sessions for quick and easy viewing of the customer and order details.
Guide Video
Documents
Login to WordPress Admin section and go to the plugins section.
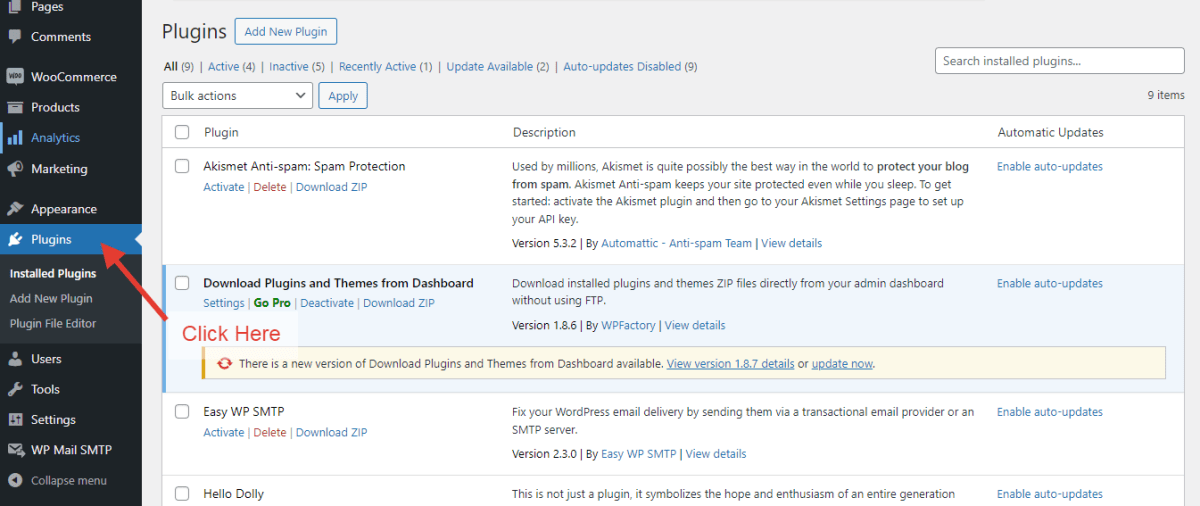
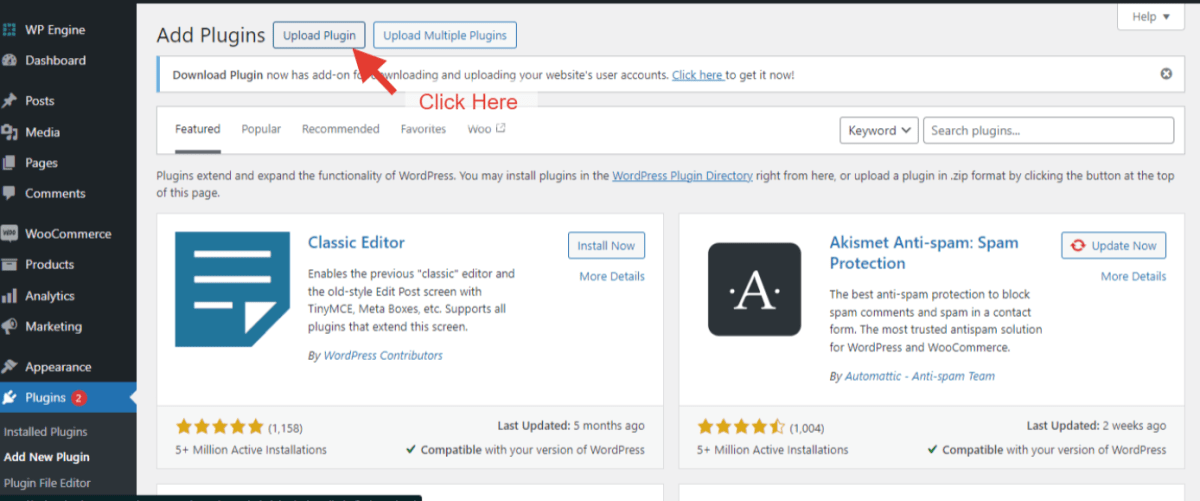
Click on “Add New Plugin” then click on “Upload Plugin”.
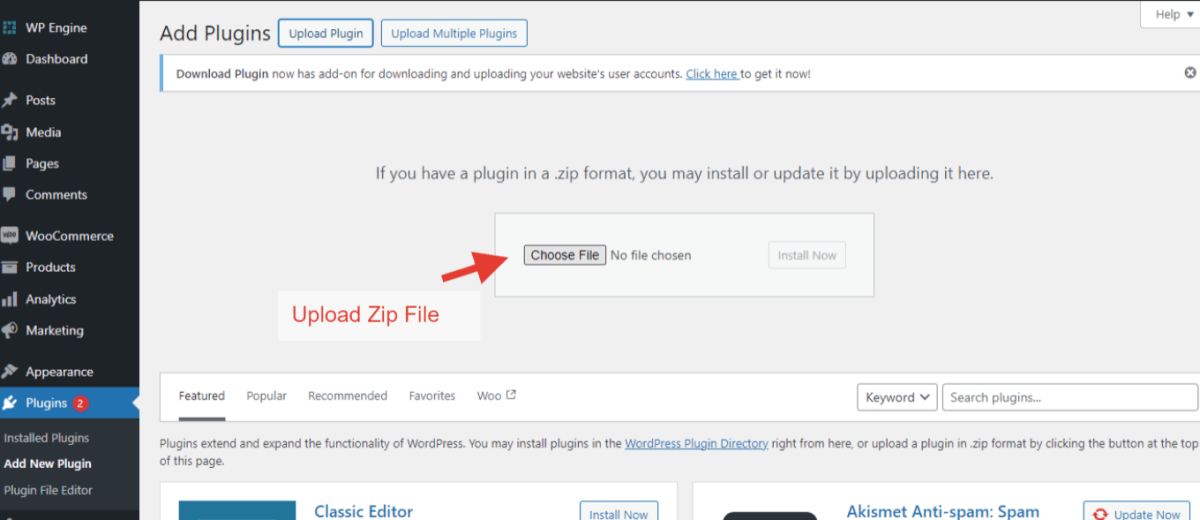
Upload the plugin zip folder to plugin installation.
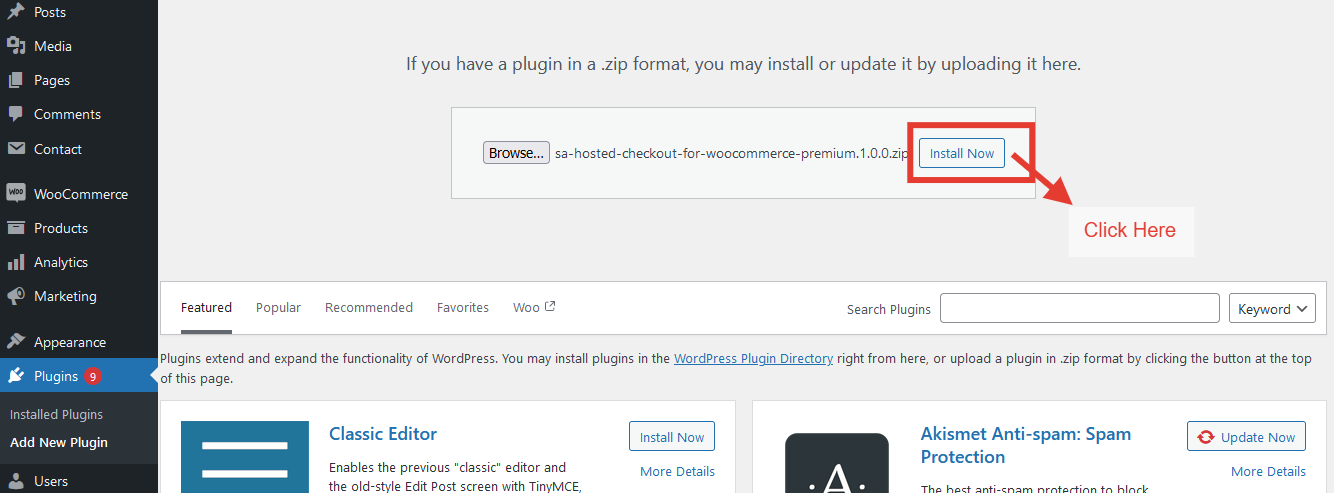
Click on the “Install Now” Button.
After Installation Click on the Activate Plugin button.
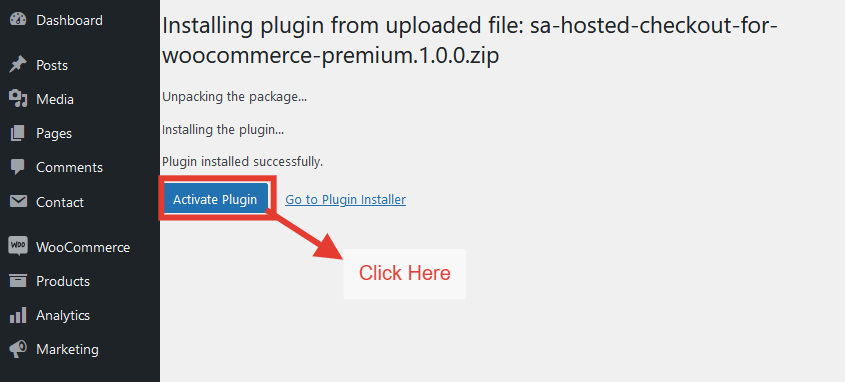
After activating the plugin, you’ll see a new plugin titled “SA Hosted Checkout for WooCommerce” added on the installed plugin dashboard. This indicates the plugin is successfully installed on your website.
Enter your license key and continue after activating the license key.
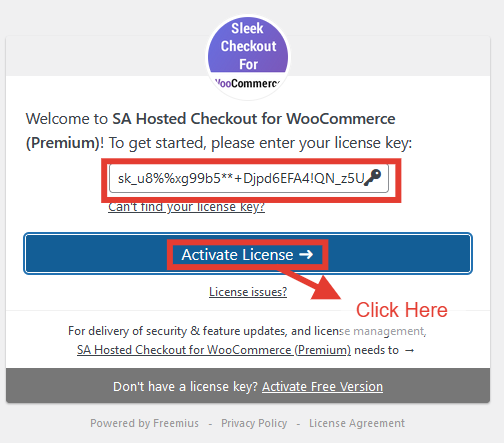
After activating the plugin, you’ll see a new plugin titled “SA Hosted Checkout” added on the installed plugin dashboard. This indicates the plugin is successfully installed on your website.
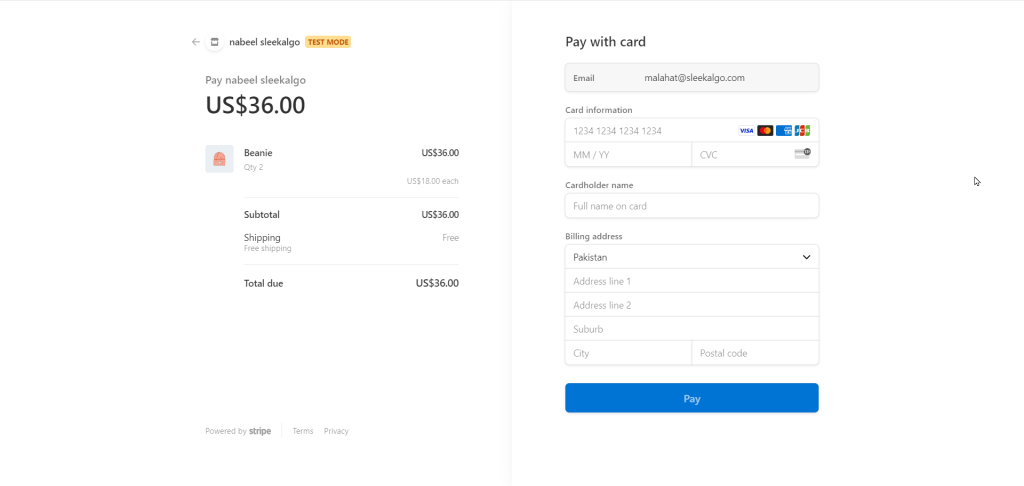
In the checkout plugin, we have the following main tabs which divides the functionality as follows:
Stripe Settings > Checkout Settings > Payment methods > Stripe Sessions
Stripe Settings:
Go to the settings page of the plugin by clicking WooCommerce and then clicking “SA Hosted Checkout”.
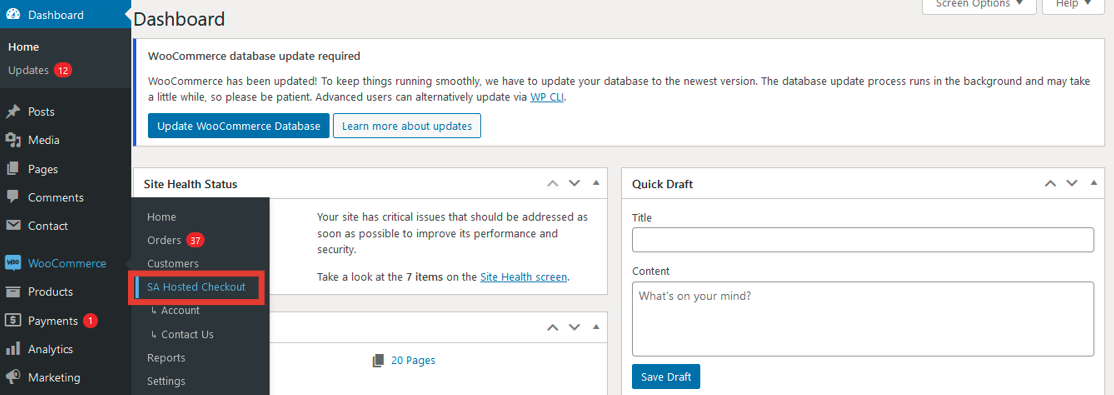
The stripe settings tab has a variety of settings to choose from inorder to customize the stripe checkout page according to your requirements. Below is a detailed description of each of the options provided.
The first and foremost is the main toggle for the plugin to enable or disable. This option allows the user to enable the plugin once all the settings are in place according to the requirements. By default, this toggle will be disabled, you need to click on “enable” in order to run the stripe checkout on your website.
Note: The Country and Currency settings should be same on the WooCommerce settings and Stripe settings page.
There is one more field that is for webhook url. Copy the webhook URL from the designated field. Then, navigate to the webhooks section in your Stripe dashboard and paste the URL there to complete the setup.
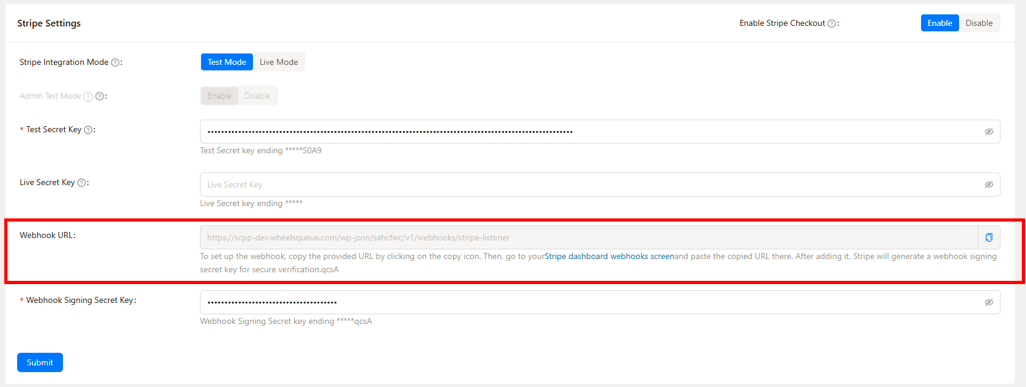
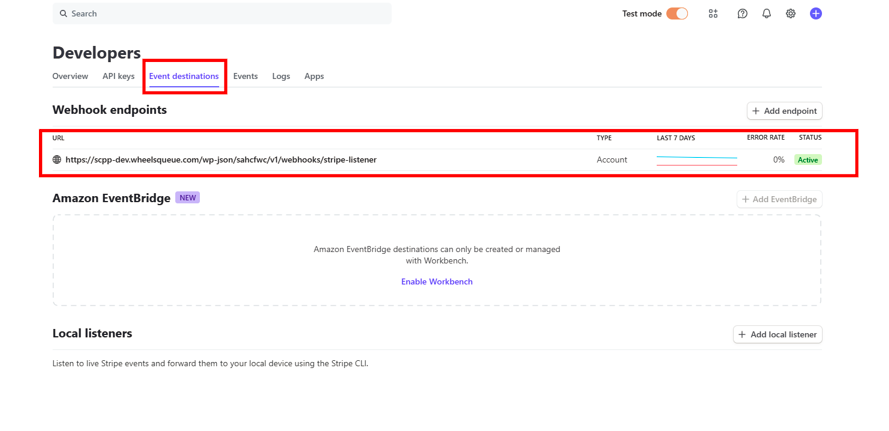
Once you have submitted the test secret keys and live secret keys, refresh the page.
How to get the live/test secret keys and webhook secret key?
Login to https://dashboard.stripe.com/login if you are already registered. In case you are using Stripe for the first time, kindly register your account on this link https://dashboard.stripe.com/register and complete all the steps of your profile.
`Once step 1 is complete, visit this link https://dashboard.stripe.com/dashboard option in the header.`
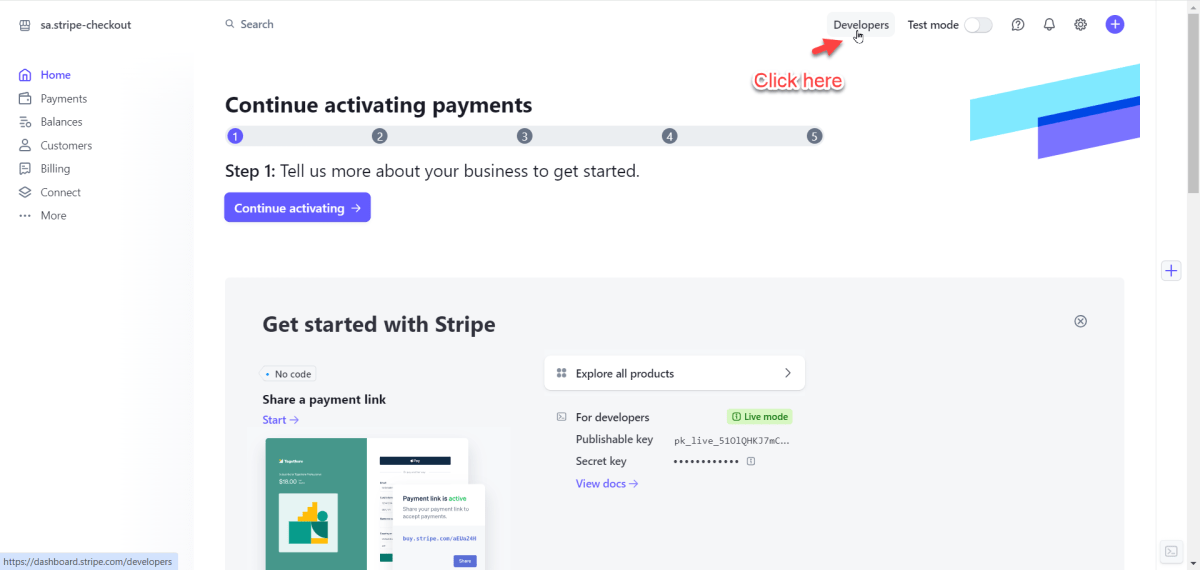
Depending on the condition of usage, you can toggle between Test mode and live mode and get the relevant secret key.

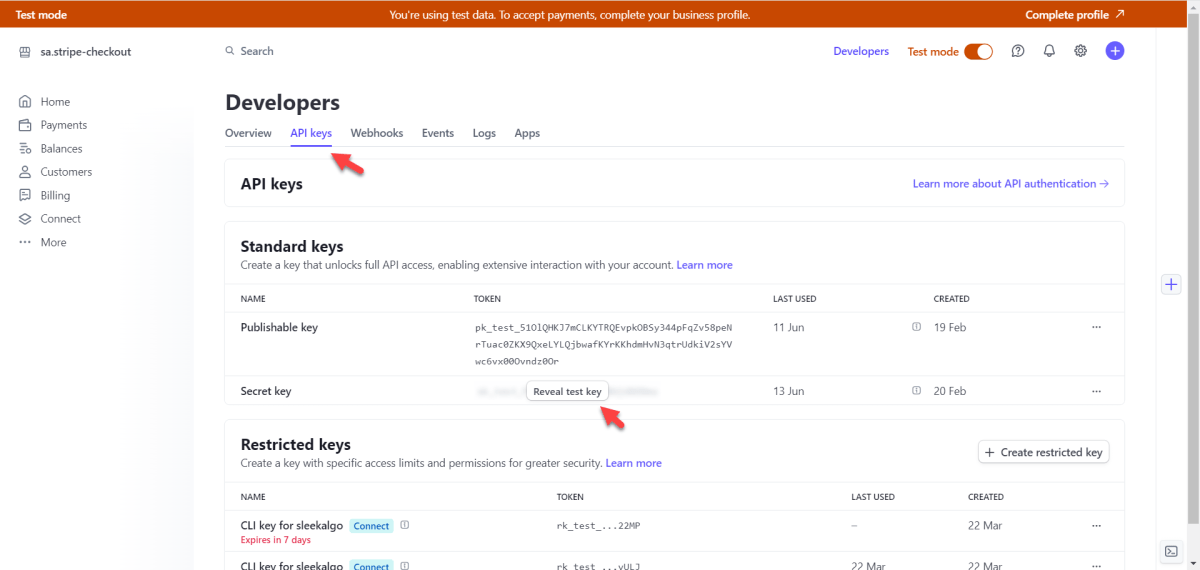
For this example, I am following the Test Mode option. After selecting the mode, click on the API keys tab, here you can see the “Secret key” label. Simply click on the “reveal key” button to get your key. Copy and paste the key in plugin stripe settings.
Next we have to generate a webhook key, for this purpose click on the webhook tab and click on the “Add endpoint” option.
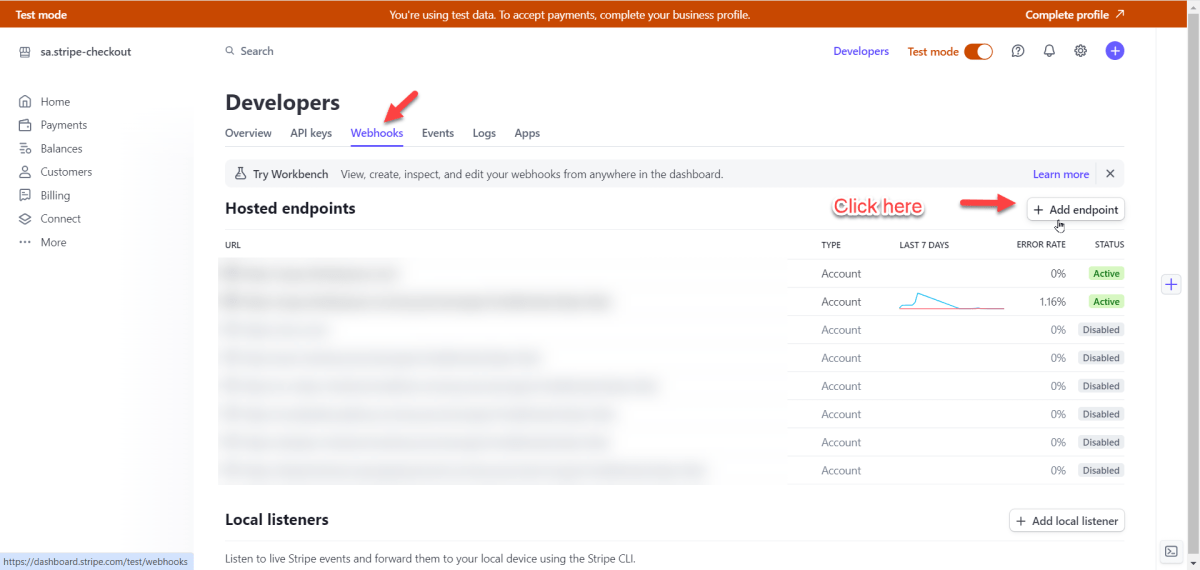
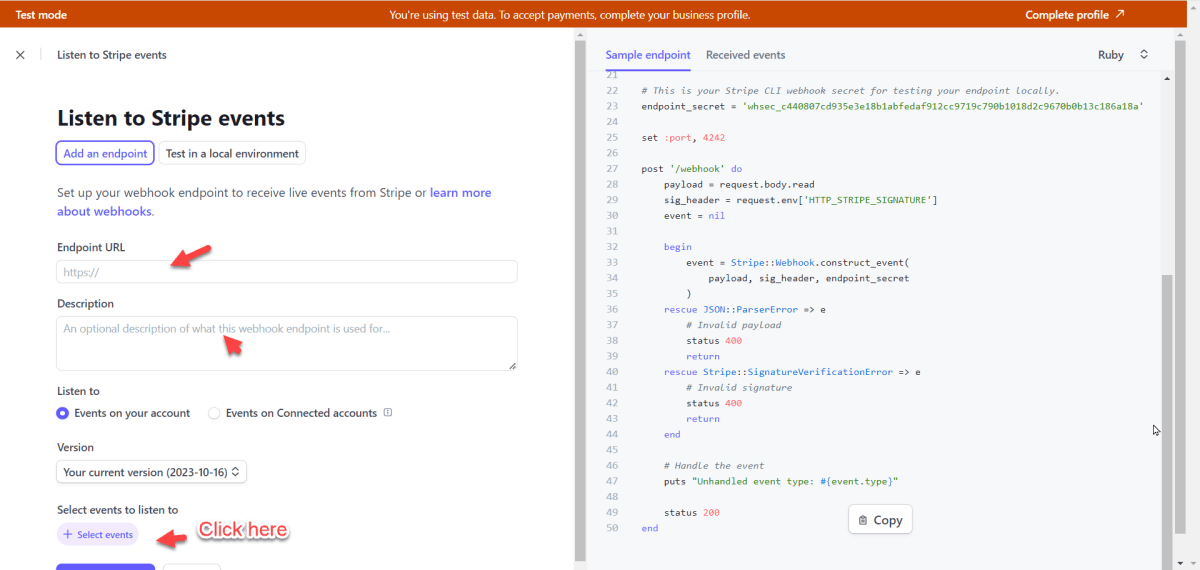
On this page, enter your website URL/wp-json/sa/scpp/v1/webhooks/stripe-lister and its description in the given fields, once done, click on the “Select events” option. Example: https://www.abc.com/wp-json/sa/scpp/v1/webhooks/stripe-lister
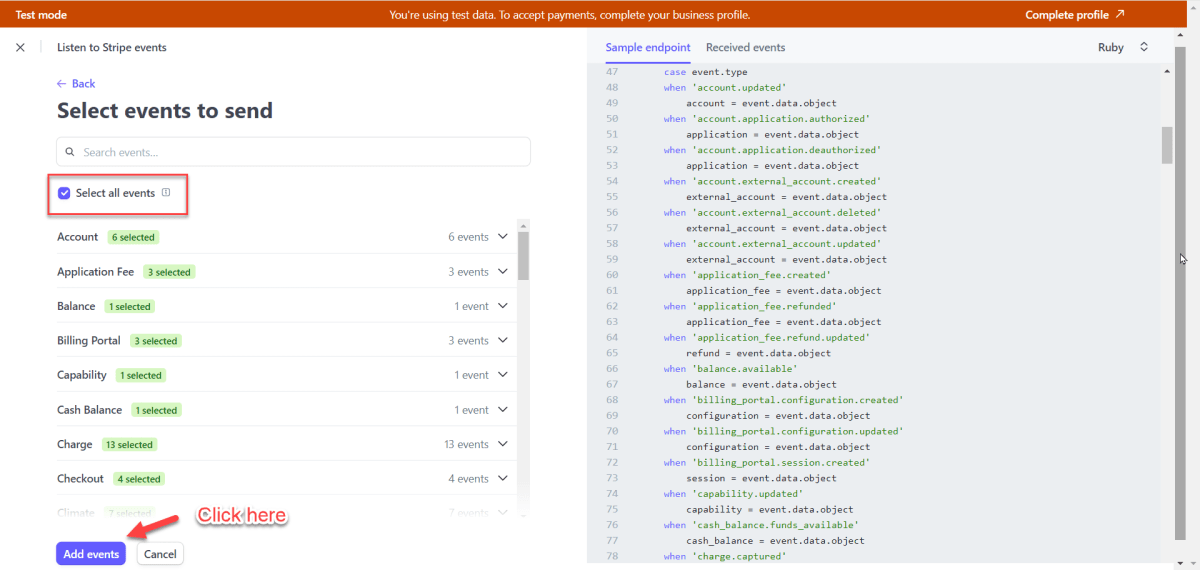
Click on the checkbox to select all the events and then click on the “add events” button.
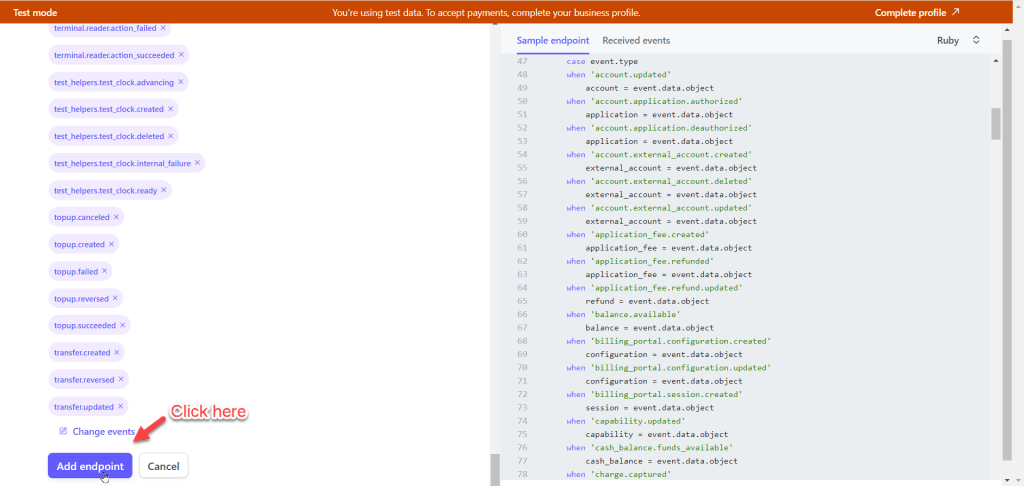
You will be redirected back to the endpoint page where you will see a list of all the events selected, simply click on the “ Add endpoint” button.
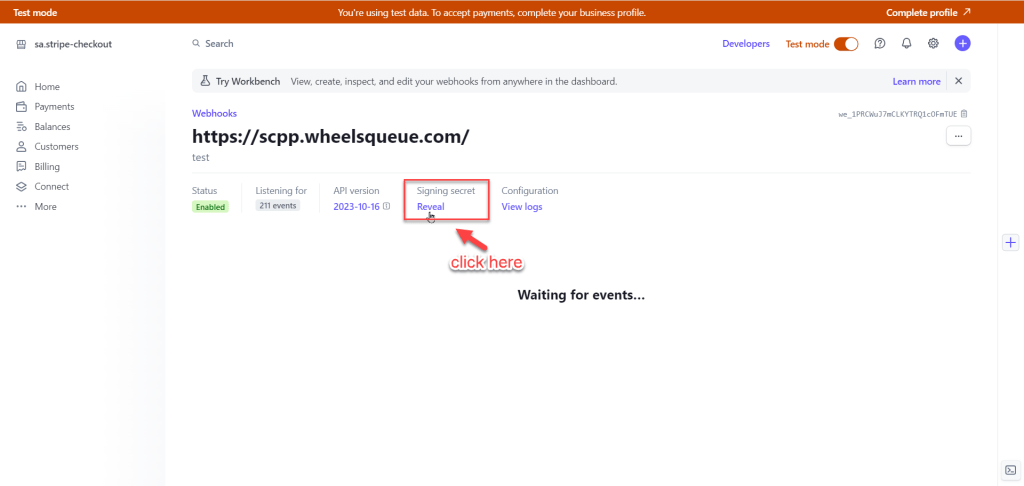
You can now click on the “reveal” option to view your webhook secret key. Simply copy/paste this key in the plugin webhook field and click on “Submit”.
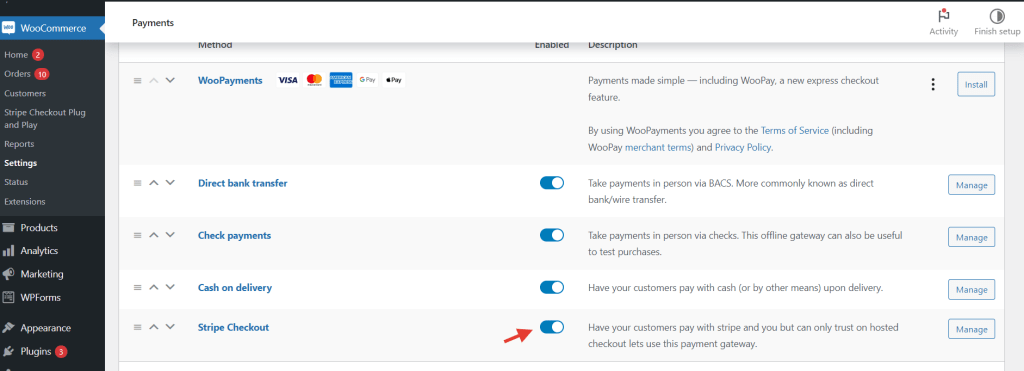
Since WooCommerce offers different payment methods by default, it is a mandatory step to enable the Stripe Checkout plugin from the WooCommerce {‘>>’} Settings {‘>>’} Payment Methods in order to set it as a payment method after the keys are entered in the Stripe Settings tab.
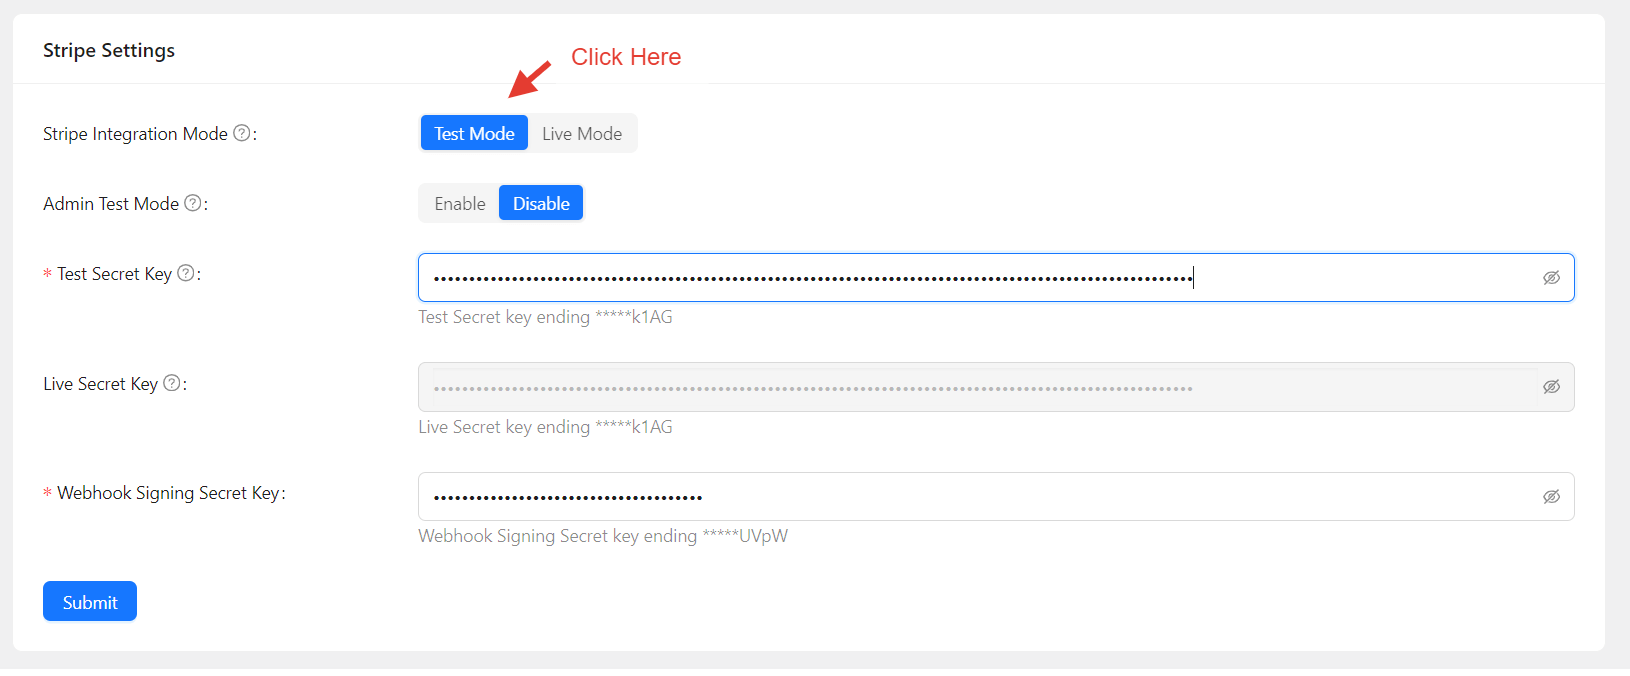
Stripe Integration Mode:
This option allows you to either use a test mode or live mode. The test mode uses test data and the live mode allows access to the actual data for your customers. Each mode has its own secret key which can be used in the fields of keys as presented.
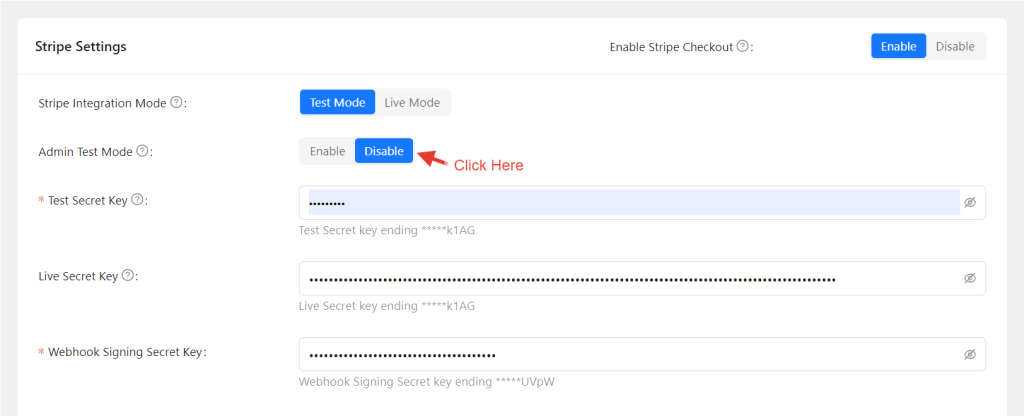
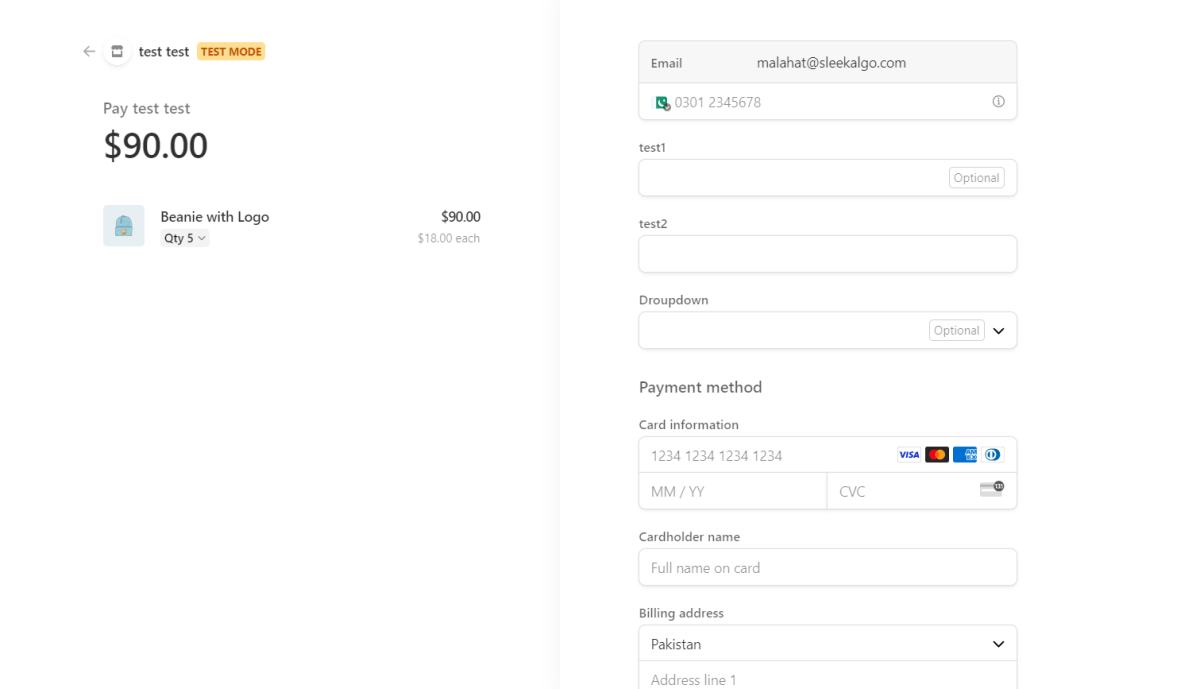
Admin Test Mode:
Admin Test Mode allows ONLY the administrators of the website to enable test mode and proceed with test orders on the website using test stripe payment.To enable the option for administrators, simply click on the “Enable” tab.
CheckOut Settings:
Checkout settings page comes up with different options that can be used in order to customize the stripe checkout page as per requirements. Following are the options for configuring Checkout settings:
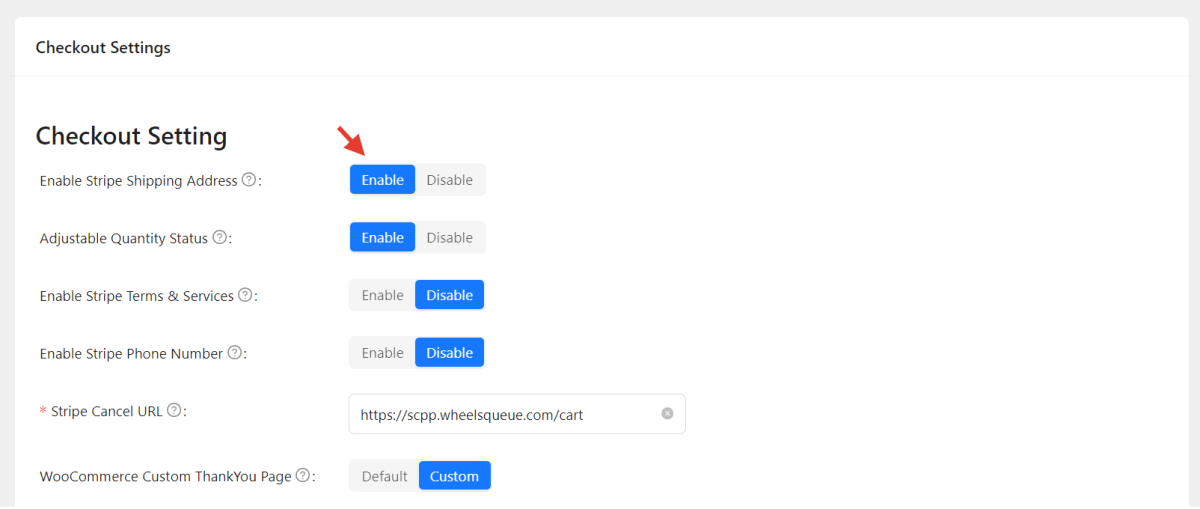
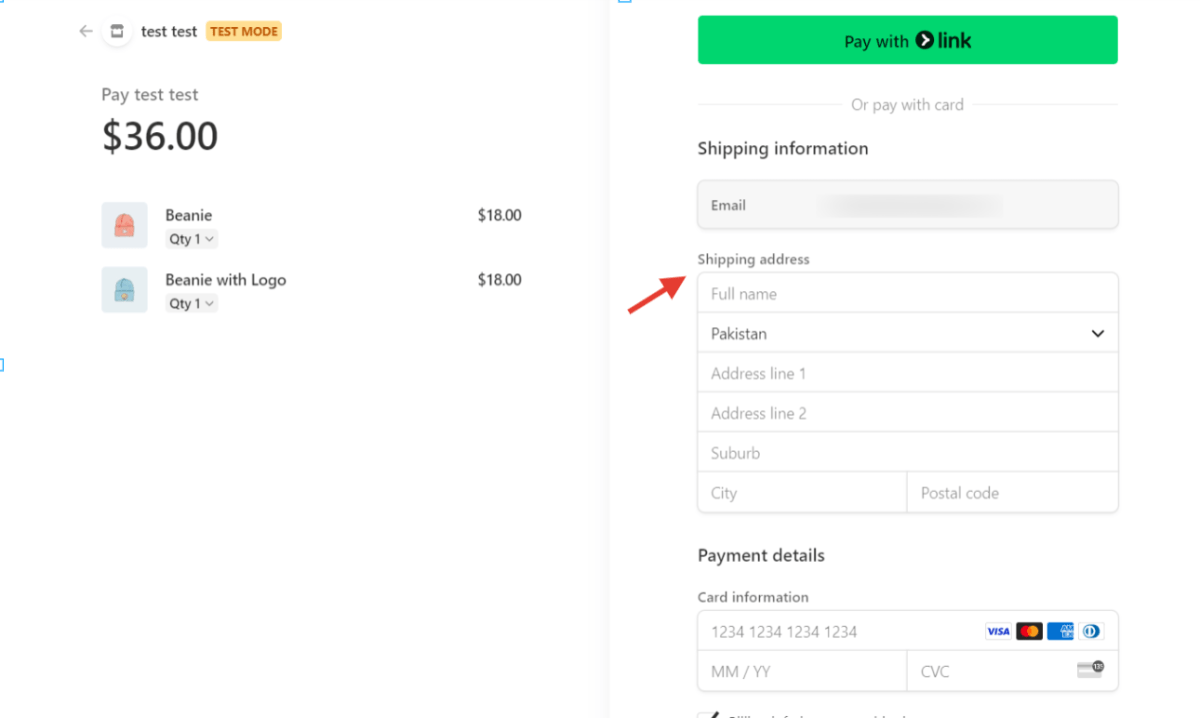
Enable Stripe Shipping Address:
This option when enabled provides a Shipping Address field on the stripe checkout page. This option provides an extra set of fields so that customers can enter their shipping details precisely.
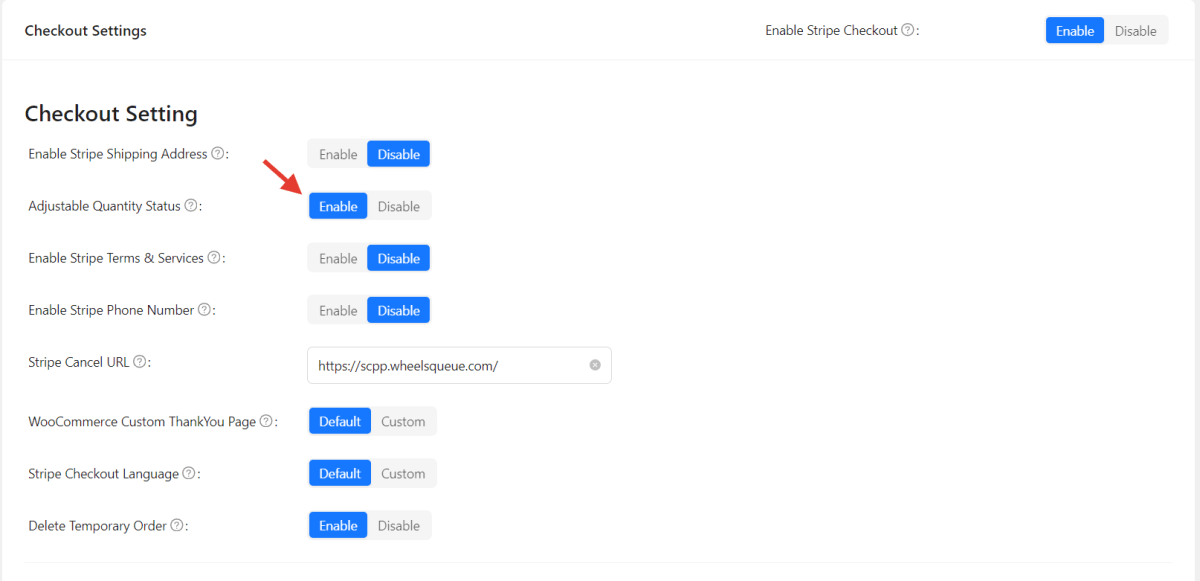
Adjustable Quantity Status:
This option allows customers to adjust the quantity of their products on the stripe checkout page without the need of going back to the cart in order to make quantity changes. When enabled, it will display a ‘Qty’ dropdown under the product on the stripe checkout page, customers can click on the dropdown and a popup will appear to increase/decrease the product quantity and click on “Update” to update the order.
This feature will also automatically calculate the Total/subtotal of the order according to the quantity adjusted.
Enable Stripe Terms & Services:
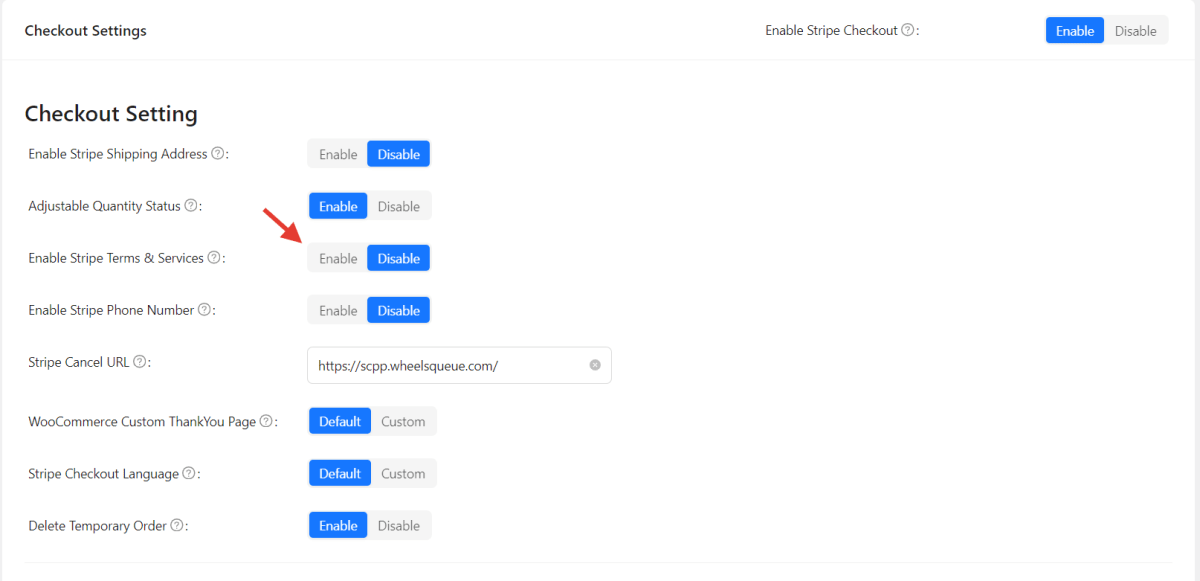
This option allows you to add a Terms and Services checkbox on the stripe checkout page. You can also customize the text of this checkbox (discussed later in the manual).
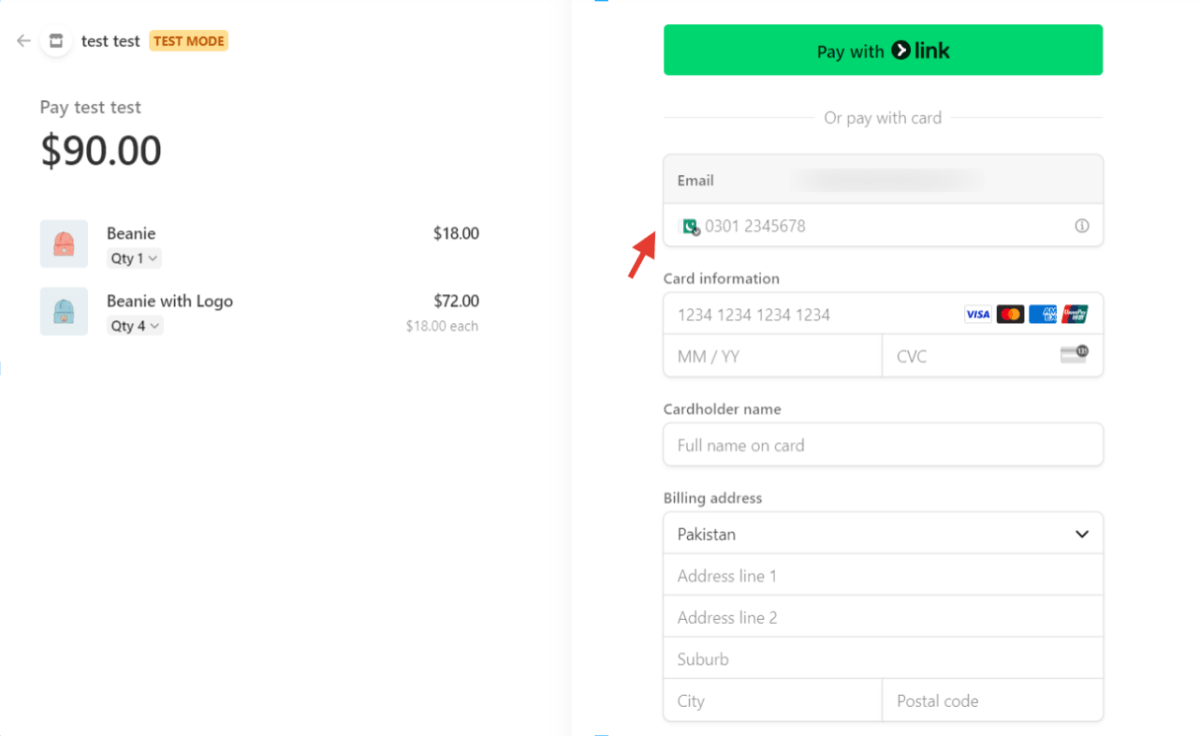
Enable Stripe Phone Number:
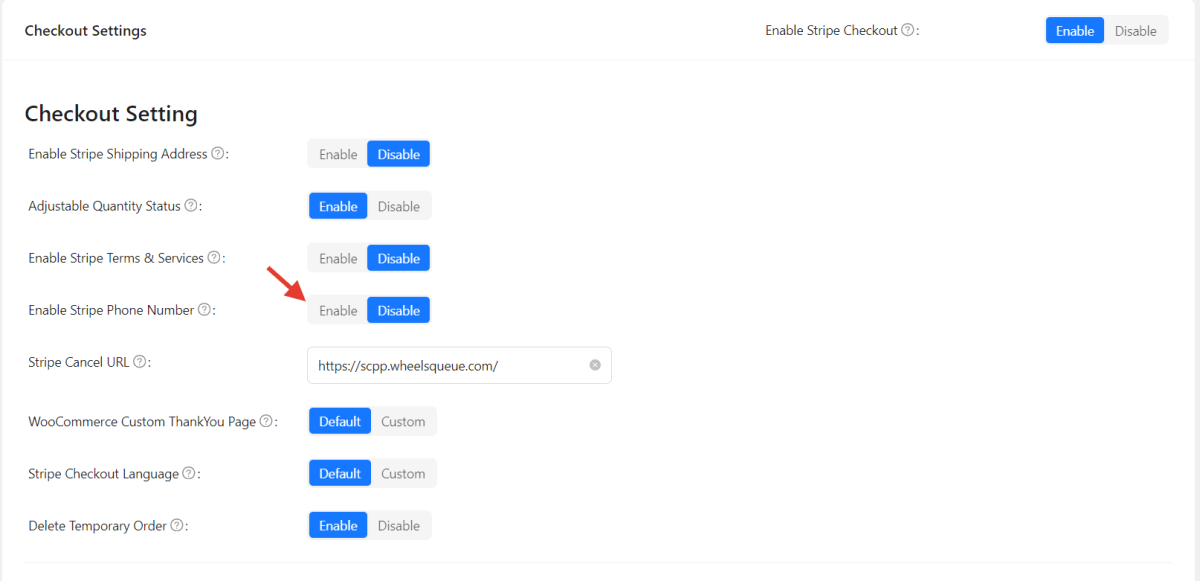
This option allows you to enable a Phone Number field on the stripe checkout page where customers can enter their contact information to proceed with order.
Stripe Cancel URL:
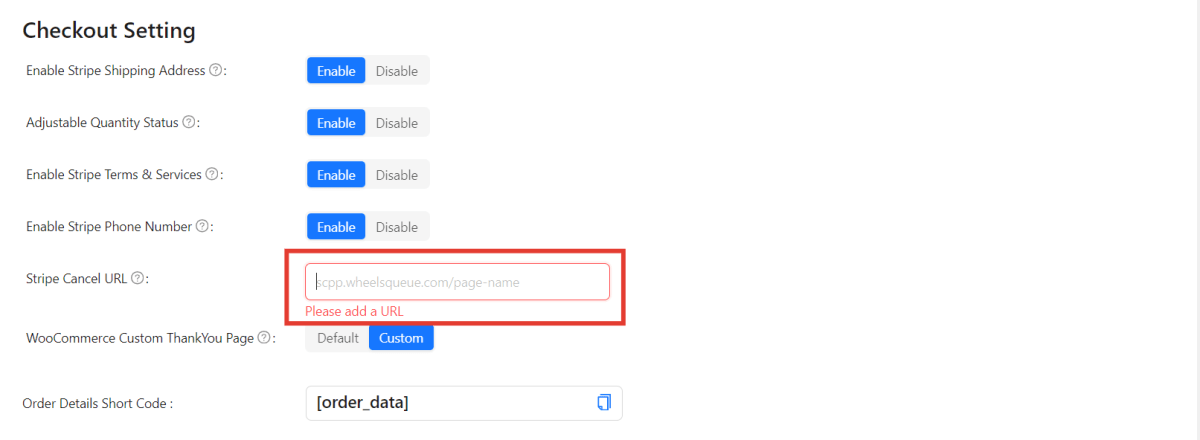
This option provides a field to set a page URL which can be used as a landing page incase a customer goes back from the stripe checkout page or cancels the stripe checkout.
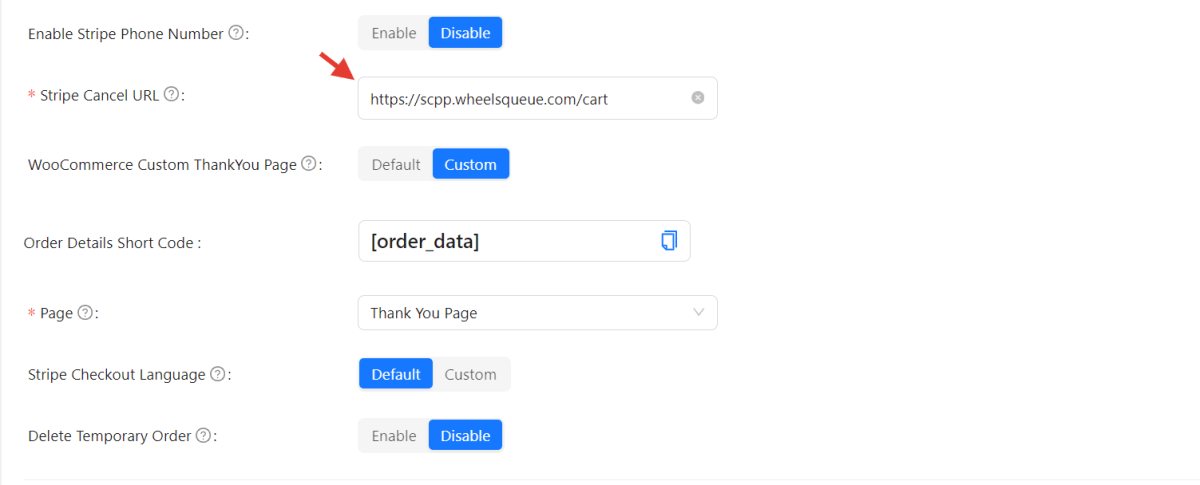
Stripe cancel URL field is a compulsory field. You must enter a URL inorder to complete the settings.
WooCommerce Custom ThankYou Page:
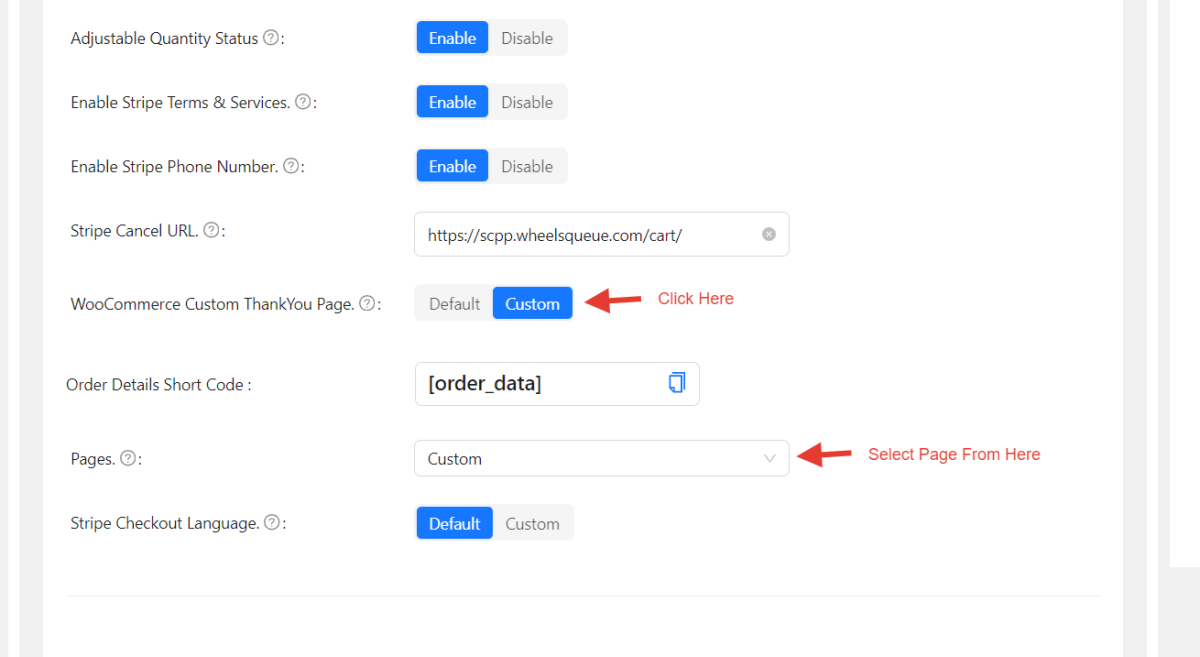
WooCommerce provides a default thank you page for your website when an order is placed. You can select the “Default” tab to use this. In case you want to display a customized Thank you page for your customers, click on the “Custom” tab. This will present two more options, Order Details Shortcode and Pages.
The shortcode contains all the order information that can be used to display on a thankyou page. Simply copy/paste the shortcode from here and add it on the page that you wish to use as a custom Thank you page.
From the pages dropdown, you can select the Thank you page that you wish to display once a customer completes an order.
Stripe Checkout Language:
WooCommerce uses English on default for the checkout, this option will be preselected on the plugins settings.
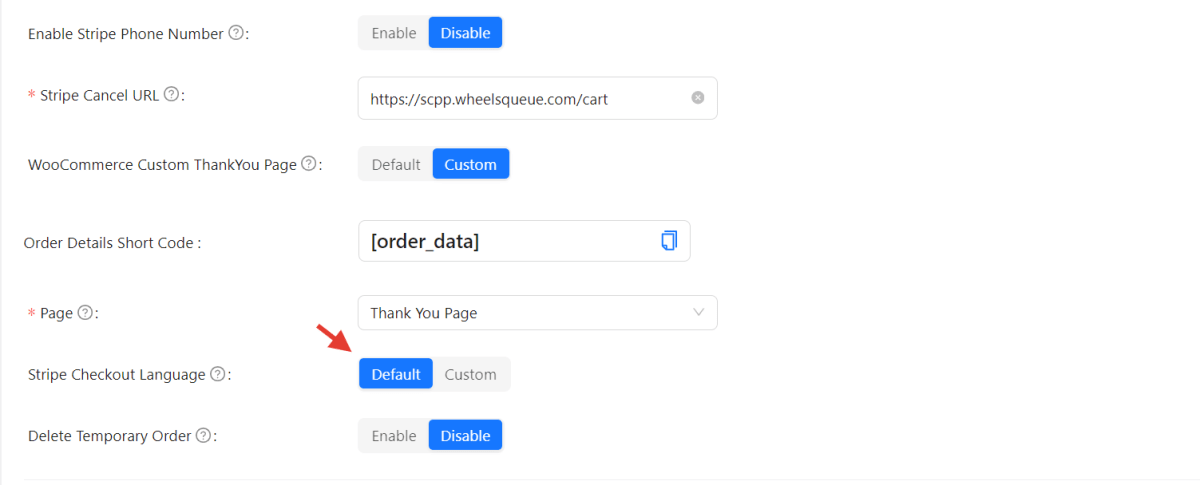
In case you want to use a different language, simply click on the “Custom” tab and you will be presented with dropdown to select different languages for your stripe checkout page.
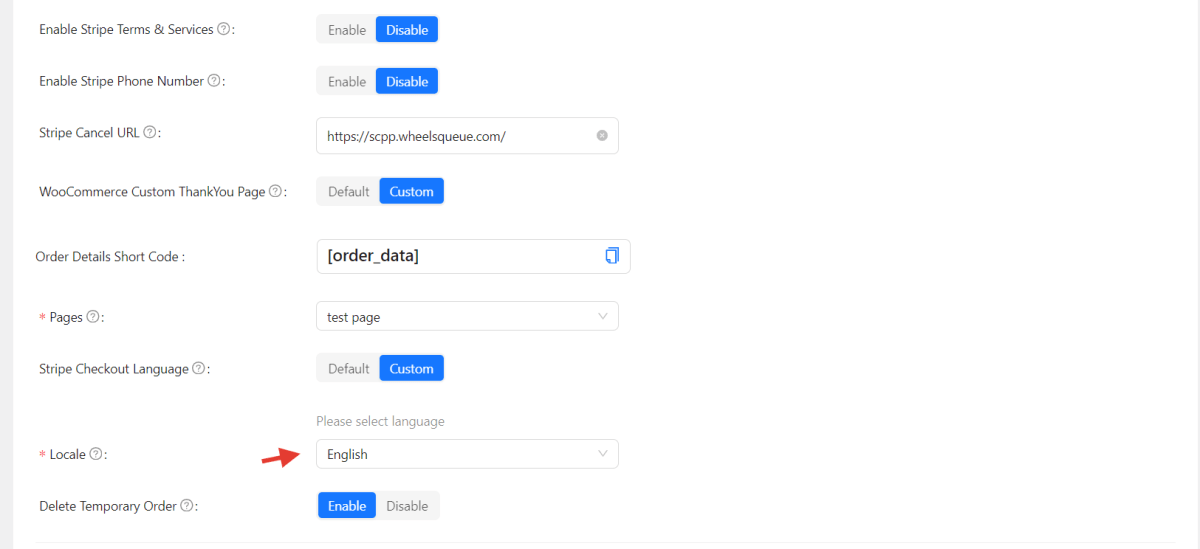
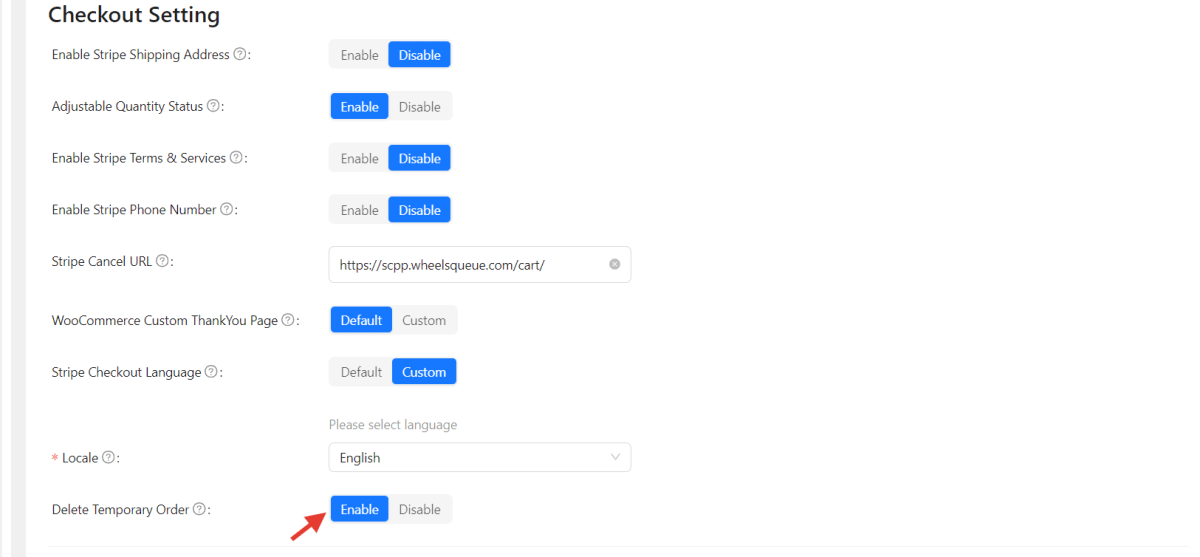
Delete Temporary order:
WooCommerce creates an instance of an order which is not yet paid or canceled. This is considered to be a temporary placement of an order before it is finalized (paid or canceled). This option provides the flexibility to keep these temporary orders or delete them.
By default, “Enabled” option is selected which deletes the temporary orders. To keep temporary orders, click on the “Disable” tab.
Custom Text Messages:
This feature provides you with the ability to display customized texts on your stripe checkout page to enhance user experience.
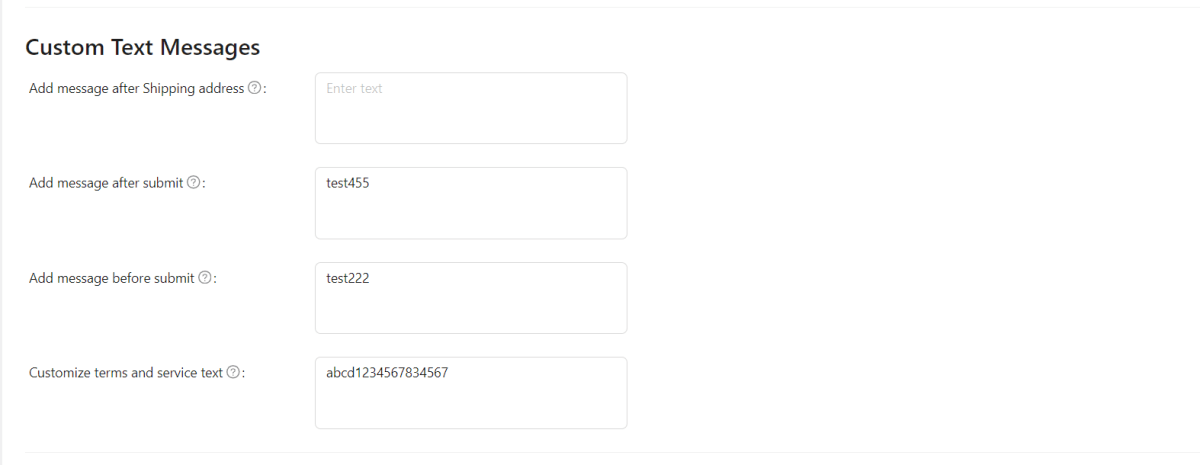
Add Message After Shipping Address:
+ You can include a text message right after the shipping address.
Add Message After Submit:
+ You can include a text message after the submit button.
Add Message Before Submit:
+ You can include a text message before the submit button.
Customize Terms And Service Text:
+ You can change the text to display with the Terms & Services checkbox.
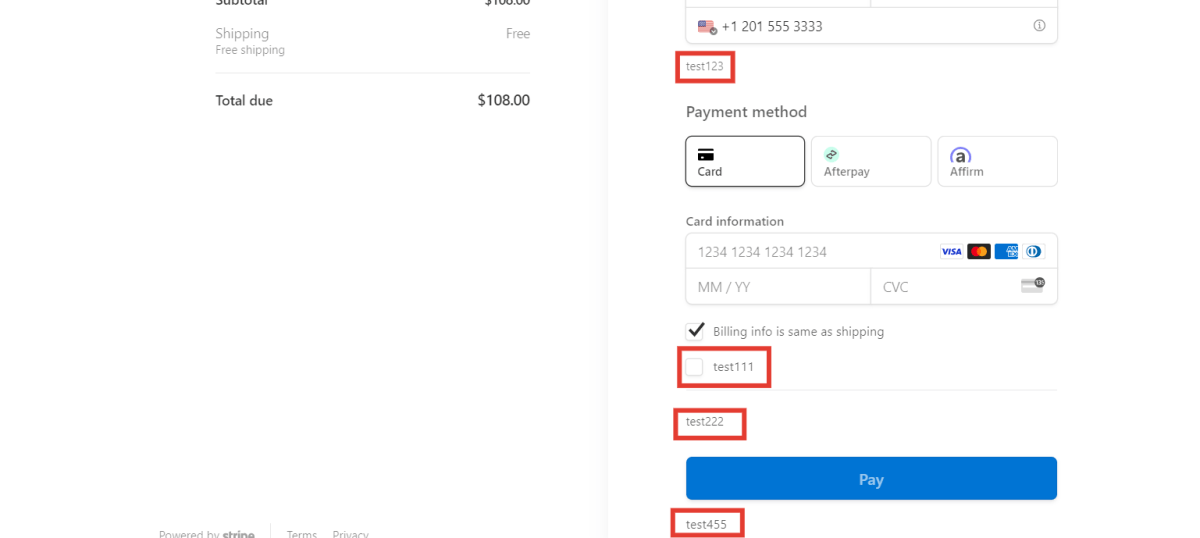
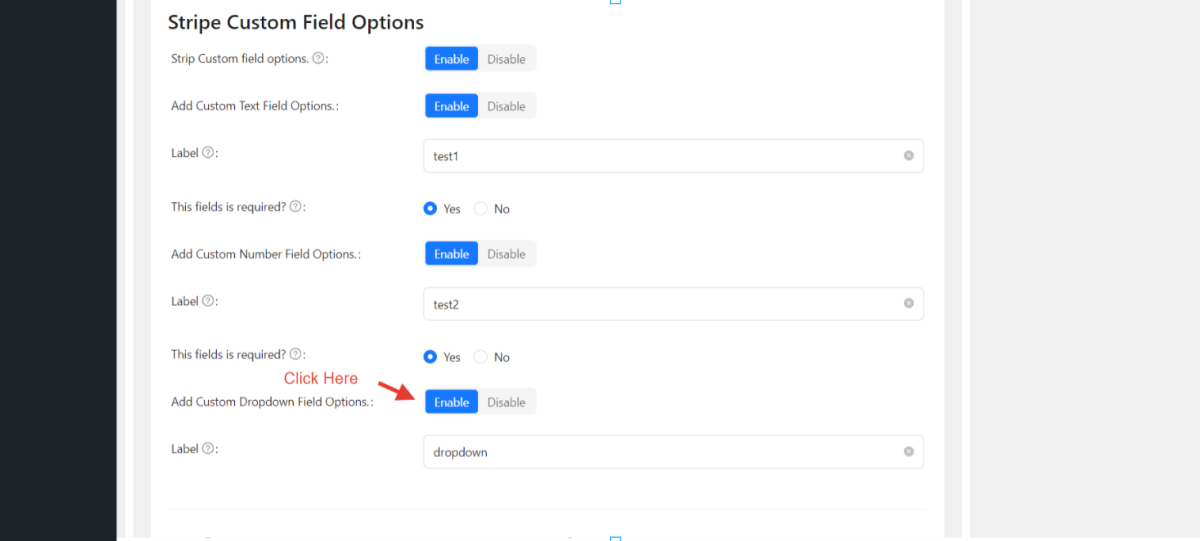
Stripe Custom Field Options:
Stripe custom fields provide you with a set of custom fields that you can introduce in your stripe checkout page for more engaging and detailed user experience. Once enabled, there are three options:
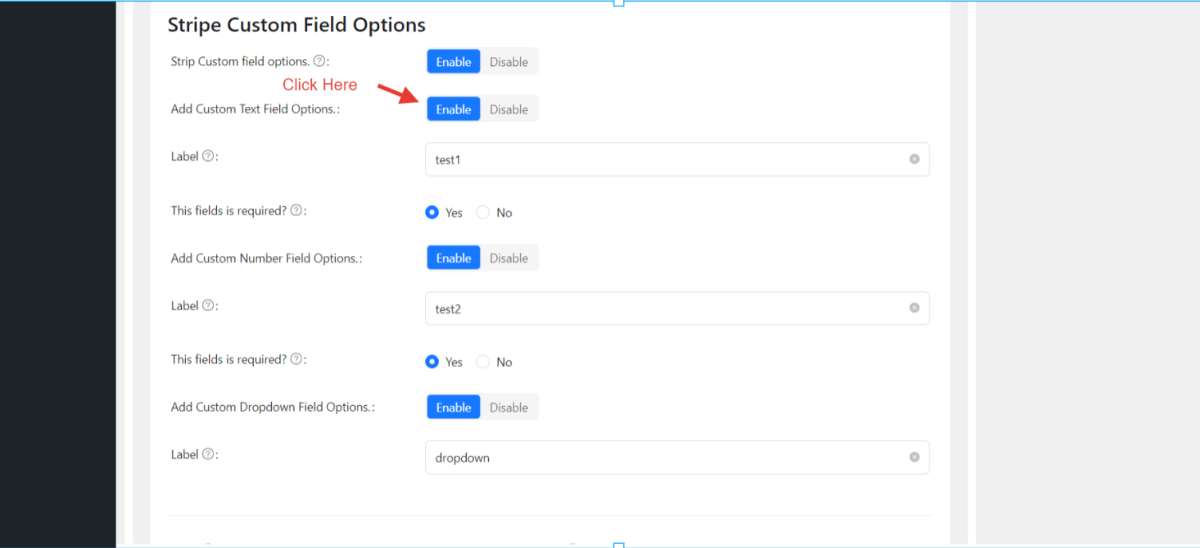
Add Custom Text Field:
> By enabling this option you can add a number field on your stripe checkout page
> In the label field, you can assign a label for your field to be displayed on checkout page.
> The radio button option can be toggled to set if a field is required or optional.
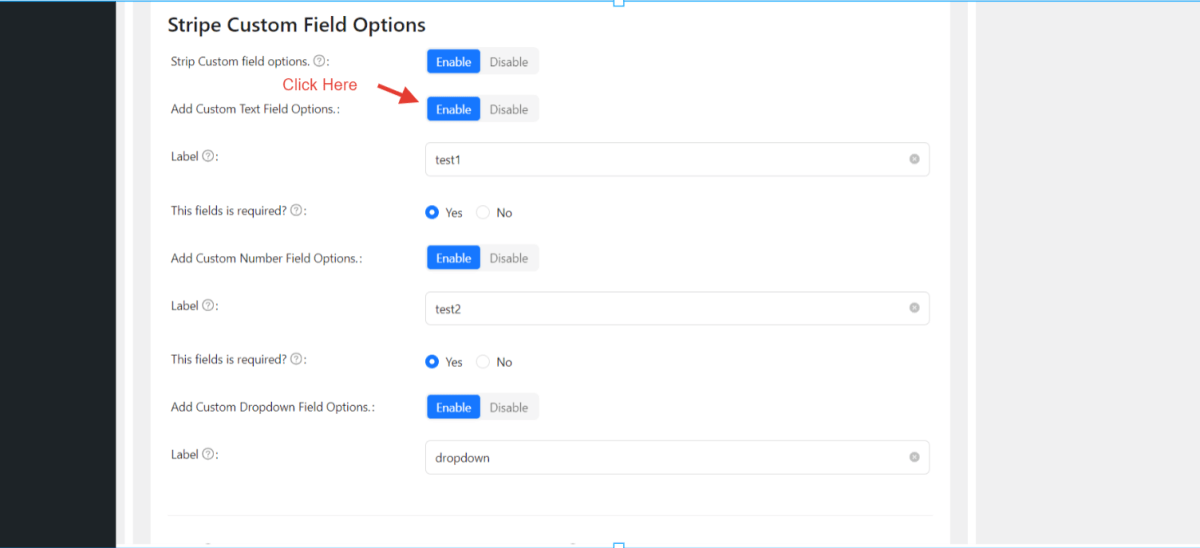
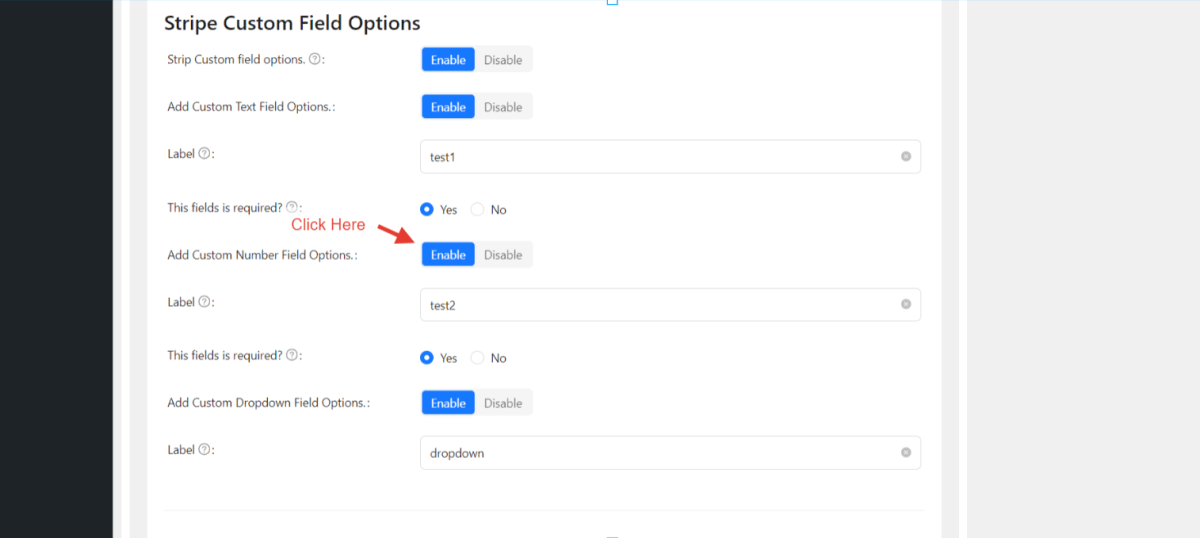
Add Custom Number Field Options.
> By enabling this option you can add a number field on your stripe checkout page
> In the label field, you can assign a label for your field to be displayed on checkout page.
> The radio button option can be toggled to set if a field is required or optional.
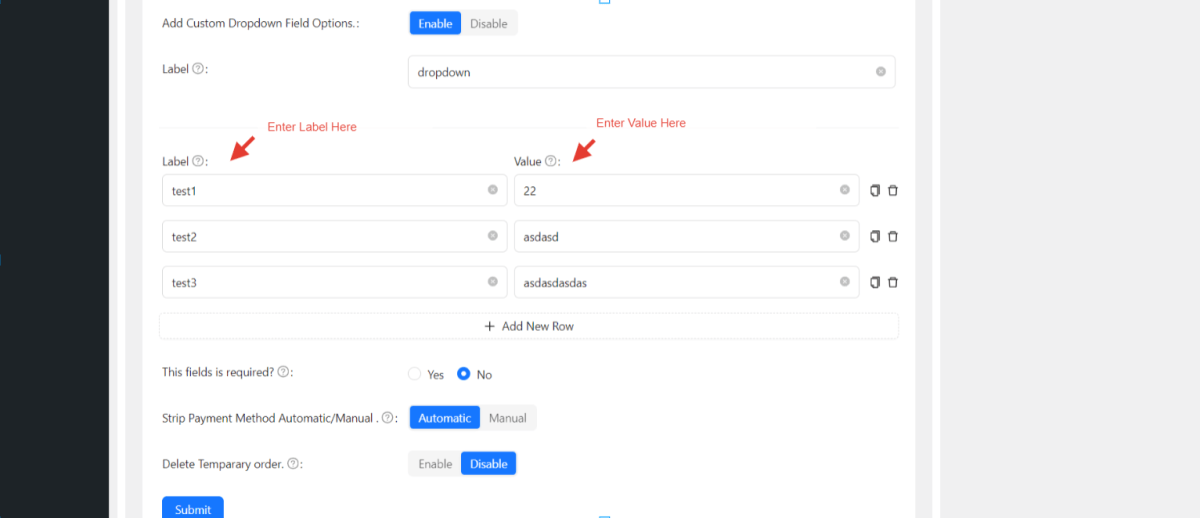
Add Custom Dropdown Field:
> By enabling this option you can add an additional dropdown field.
> In the label field, you can add the label for your dropdown to be displayed on checkout page
> For adding dropdown options, you can add labels in the field ( which will be displayed as dropdown option labels)
> In the “value” field, you can simply add the value of the option that you wish to assign for the purpose of data.
> You can add as many options as you like by clicking on the “Add Row” option
> The widgets next to the Value field are for deleting the rows or copying the rows.
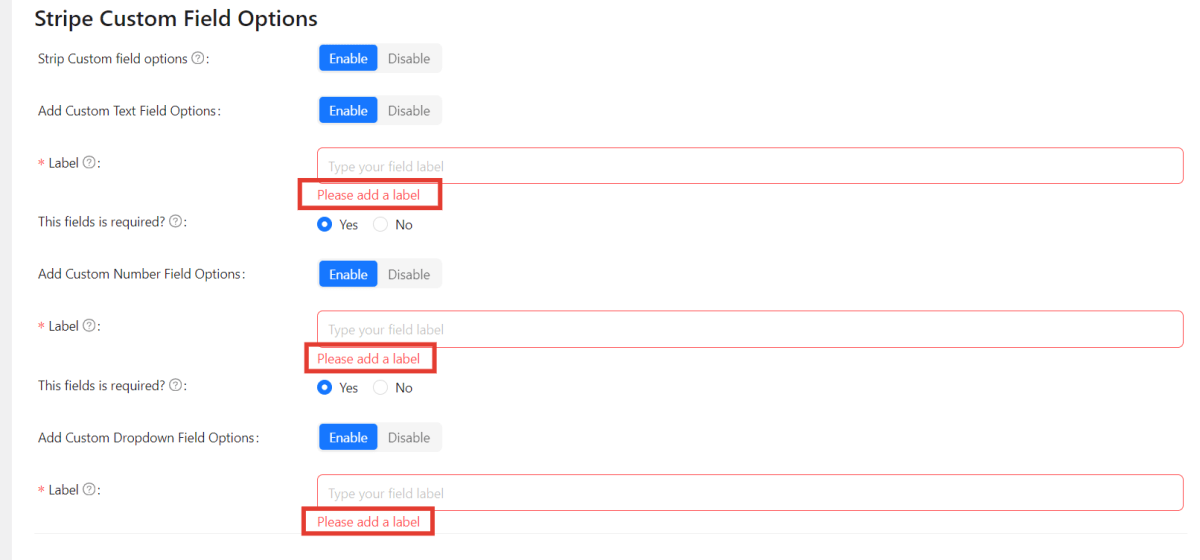
On enabling strip custom field options there is compulsory label field validation to complete settings options.
PAYMENT METHODS:
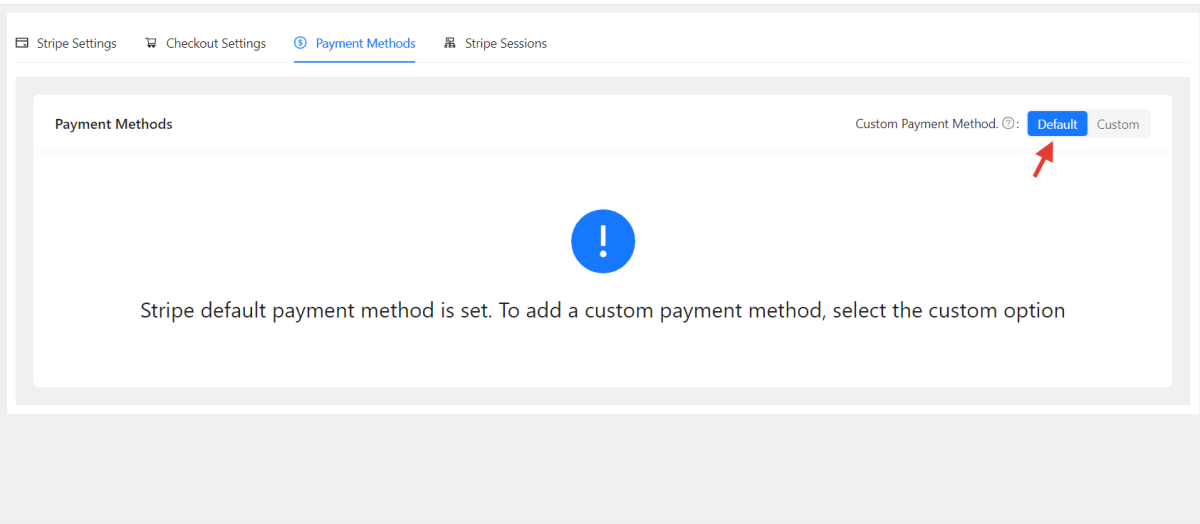
This plugin gives you the access to choose from default payment method to custom payment methods as per your requirements. Initially, the plugin is set to provide the default payment method for stripe checkout. To select custom payment methods, click on the “custom” tab to view the custom payment methods integrated with the plugin for payment.
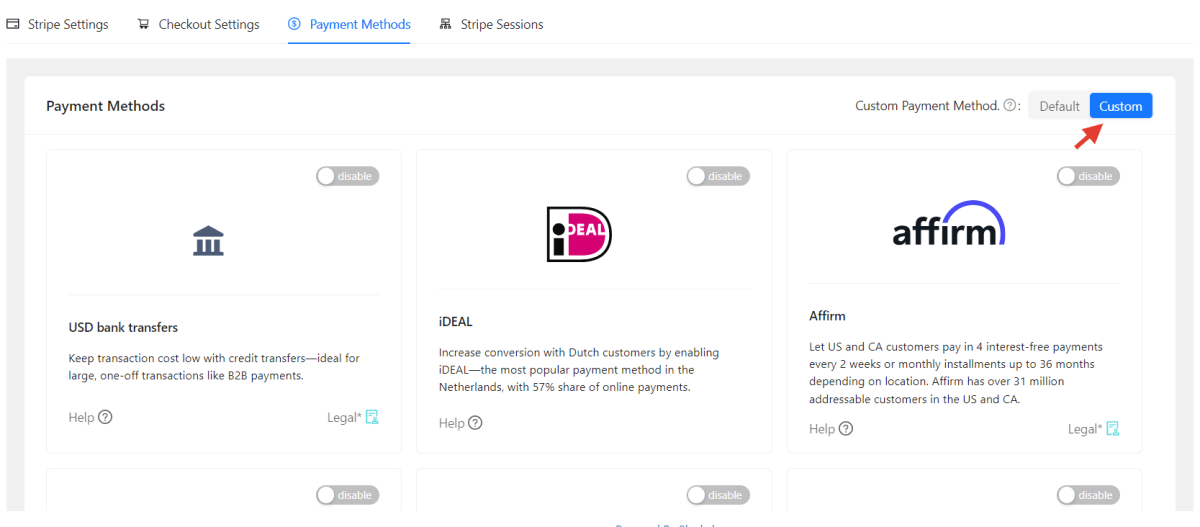
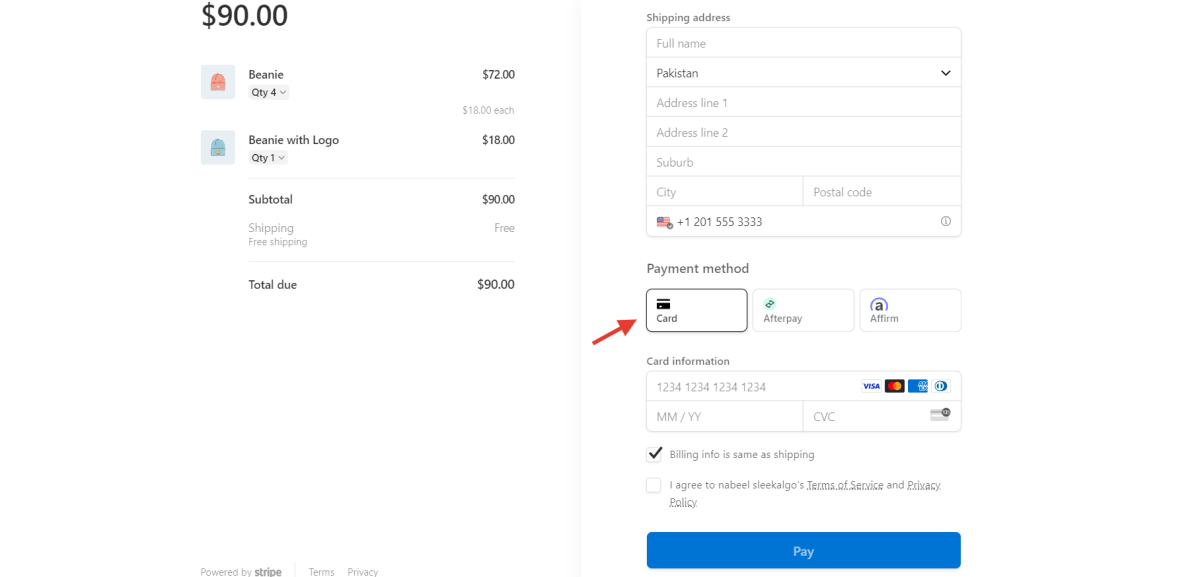
Upon selecting the Custom option, you can choose one/multiple payment methods from the displayed list on the page as shown below.
STRIPE SESSIONS:
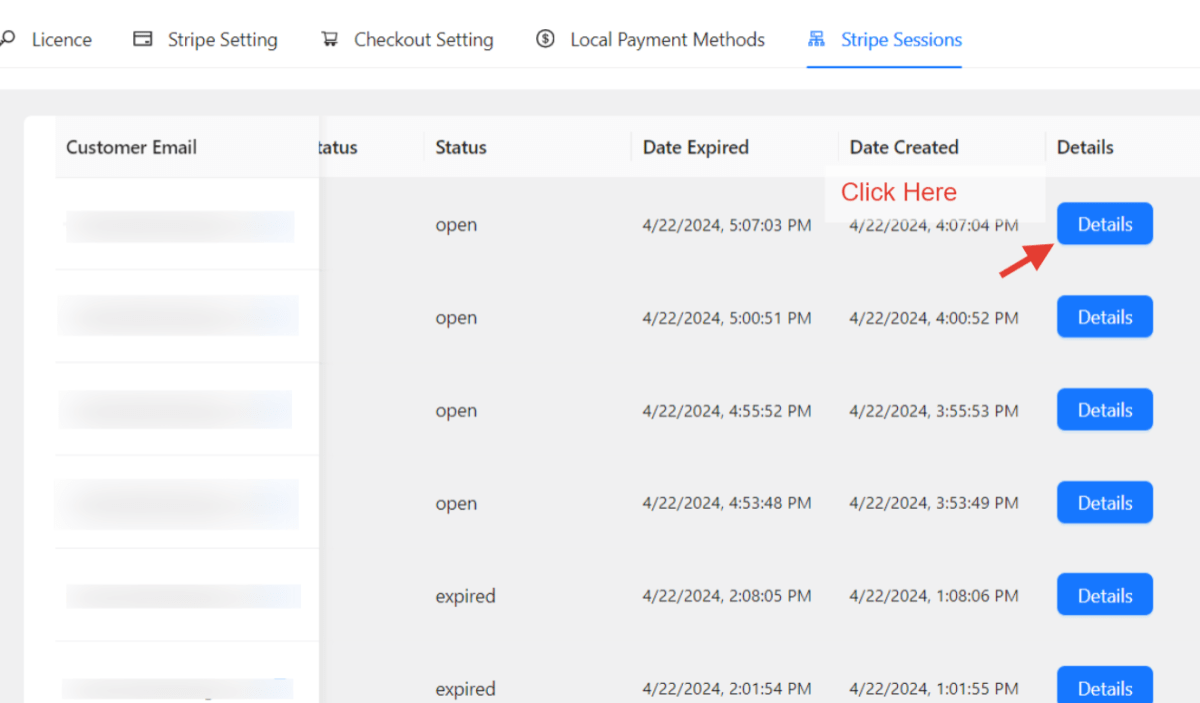
Stripe sessions are provided for detailed viewing of all the sessions that are created through the stripe checkout. Whether paid or unpaid, you can still view the customer and order details for better insight. Some of the details about sessions are as follows:
Customer Email:
> The e-mail address associated with the customer’s account.
Subtotal Amount:
> Subtotal generated against customer order
Total Amount:
> Total Amount produced for customer order
Payment Status:
> The payment status indicates whether it’s paid or unpaid order
Status:
> The status of an unpaid order whether its open or expired
Date Expired:
> Date on which the unpaid session expired
Date Created:
> Date on which the session was created
Details:
> Can view complete details from this section.
By clicking on “Details” you can review session-specific information.
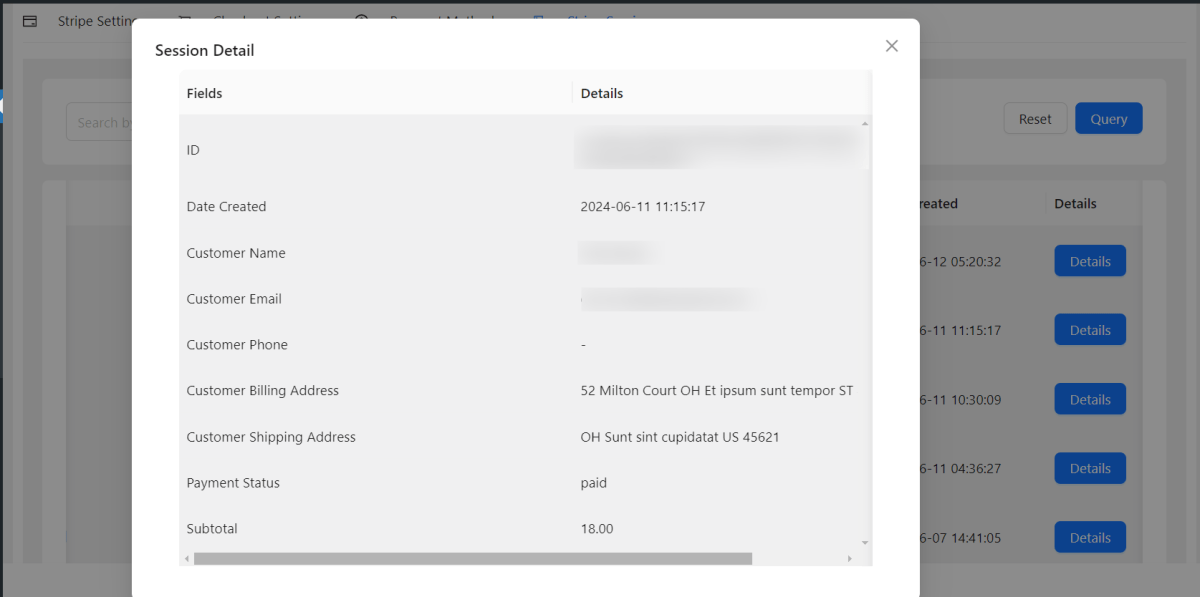
You can filter the data through email address or the start and end dates from the customer details from the strip session. Click on the “Query” button after placing the search data in the fields to filter the results.