
From WooCommerce Cart to Stripe Checkout
Give customers one checkout form, not two. Send them directly from your WooCommerce cart to Stripe Checkout, bypassing the standard WooCommerce checkout form. Choose a hosted page, embedded page or popup, all included free.


Built for WooCommerce stores, with a free version available on WordPress.org.
SleekAlgo
Product Reviews
SA Integration for Stripe Checkout and WooCommerce
SA Integration for Stripe Checkout and WooCommerce connects your WooCommerce store to Stripe Checkout. Use a Stripe-hosted payment page, embed checkout on your store, or open it in a popup. The free plugin also includes branding controls, WooCommerce coupon support, payment-method selection and checkout language settings.

WooCommerce


Stripe Checkout
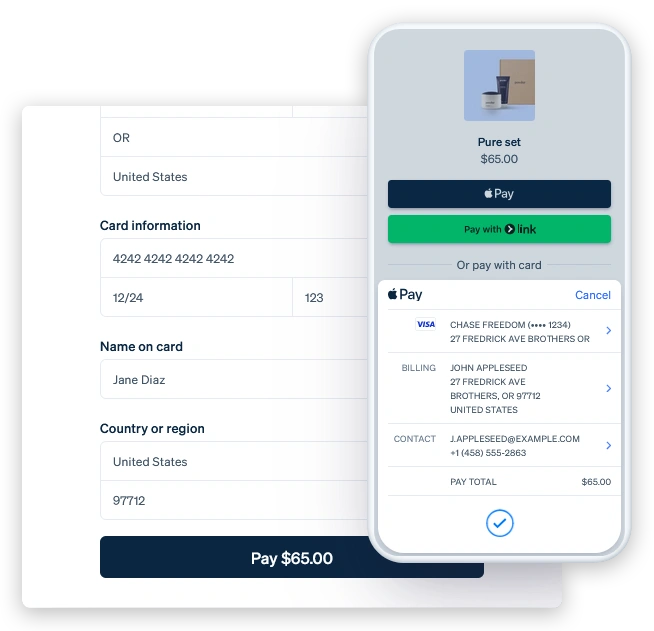
Stripe Checkout comes with:

1-click payment using Link
Real-time card validation
Address auto-complete
Streamlined payment form
Payment method reuse
Third-party autofill
Local payment methods
Desktop and mobile support
Compare Free and Premium Features


Replace WooCommerce Checkout with Stripe Checkout
Take customers directly from supported WooCommerce cart and mini-cart checkout buttons to Stripe Checkout, without completing a WooCommerce checkout form first. Choose Hosted, Embedded Page or Embedded Popup. Clear Mini-Cart feedback and keyboard-friendly popup controls help customers continue.
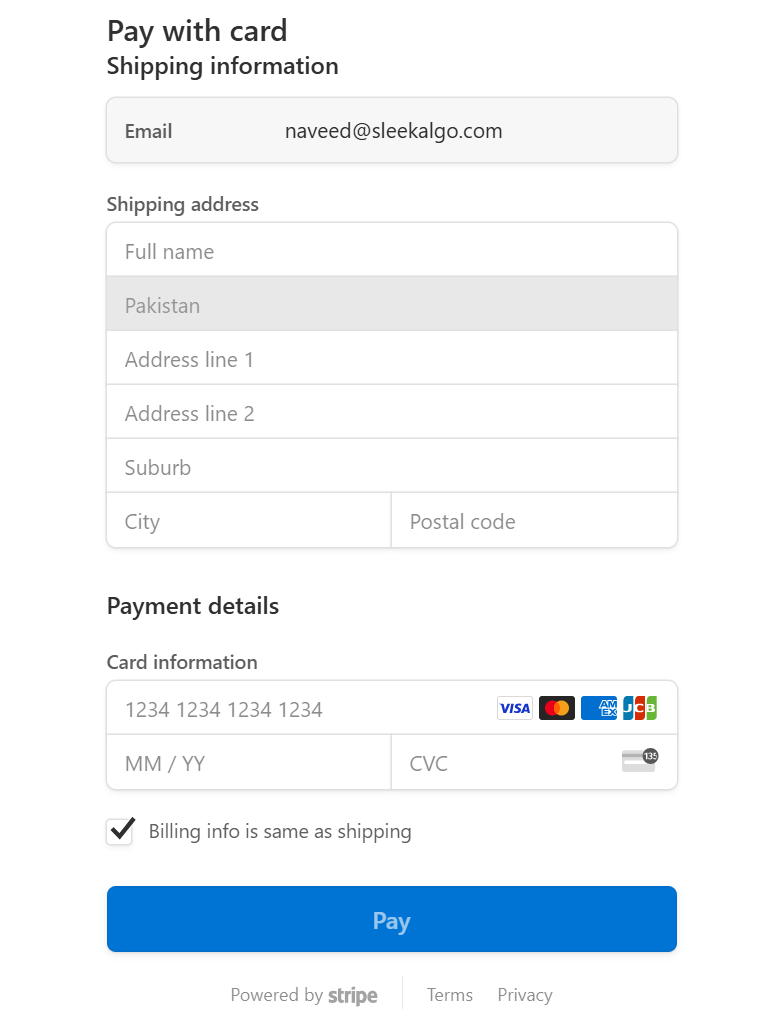
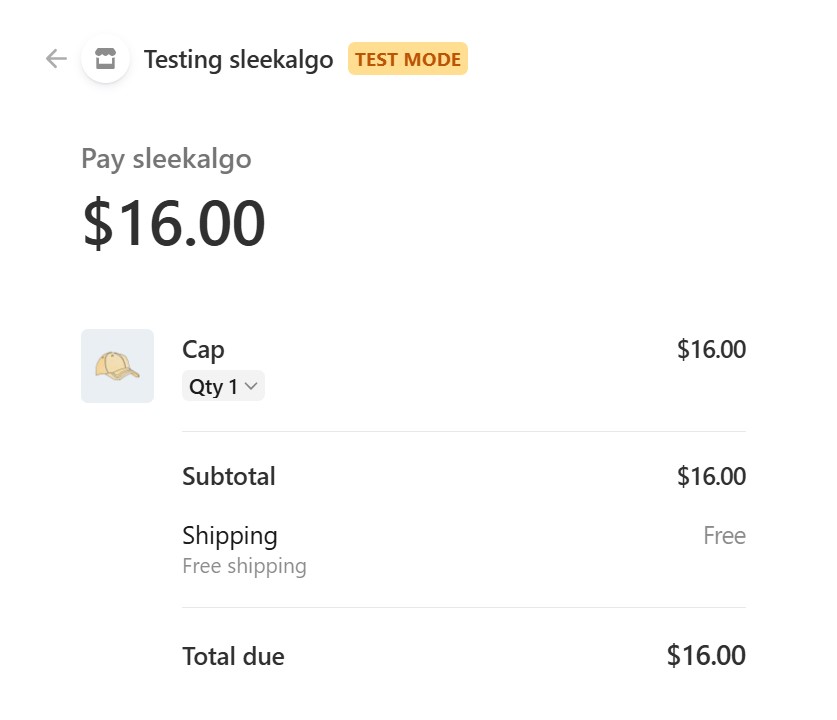
Embedded Checkout
Display Stripe Checkout on a dedicated page within your store or in a popup. Choose Hosted, Embedded Page or Embedded Popup in the free version. Stripe securely handles payment details; some payment methods may redirect customers for authorization.
Stripe Managed Payments
Offer Stripe’s merchant-of-record checkout for eligible one-time digital products. Use Hosted Checkout, Embedded Page or Embedded Popup while keeping verified payments, customer tax and amount-only refunds connected to WooCommerce. Requires an eligible Stripe account with Managed Payments enabled.
Branding Controls
Make checkout feel like your store with a display name, background and button colors, and supported font and border styles. Add a custom logo to Hosted Checkout. These controls are free, with Stripe Dashboard branding used for settings you leave unchanged.
Setup & Health Checks
Review saved Stripe settings, check the account connection and see recent verified Checkout webhook delivery. Copy a redacted support report when you need help. Connection checks do not create a payment.
Full & Partial Stripe Refunds
Request full or partial refunds for eligible WooCommerce orders paid through this plugin and track their Stripe status. Amount-only refunds leave stock and product, fee, shipping and tax allocations unchanged.
High Performance Order Storage Support
Compatible with WooCommerce High Performance Order Storage (HPOS) and traditional WordPress order storage.
Enable or Disable Phone Number Field
Choose whether Stripe Checkout collects a customer phone number.
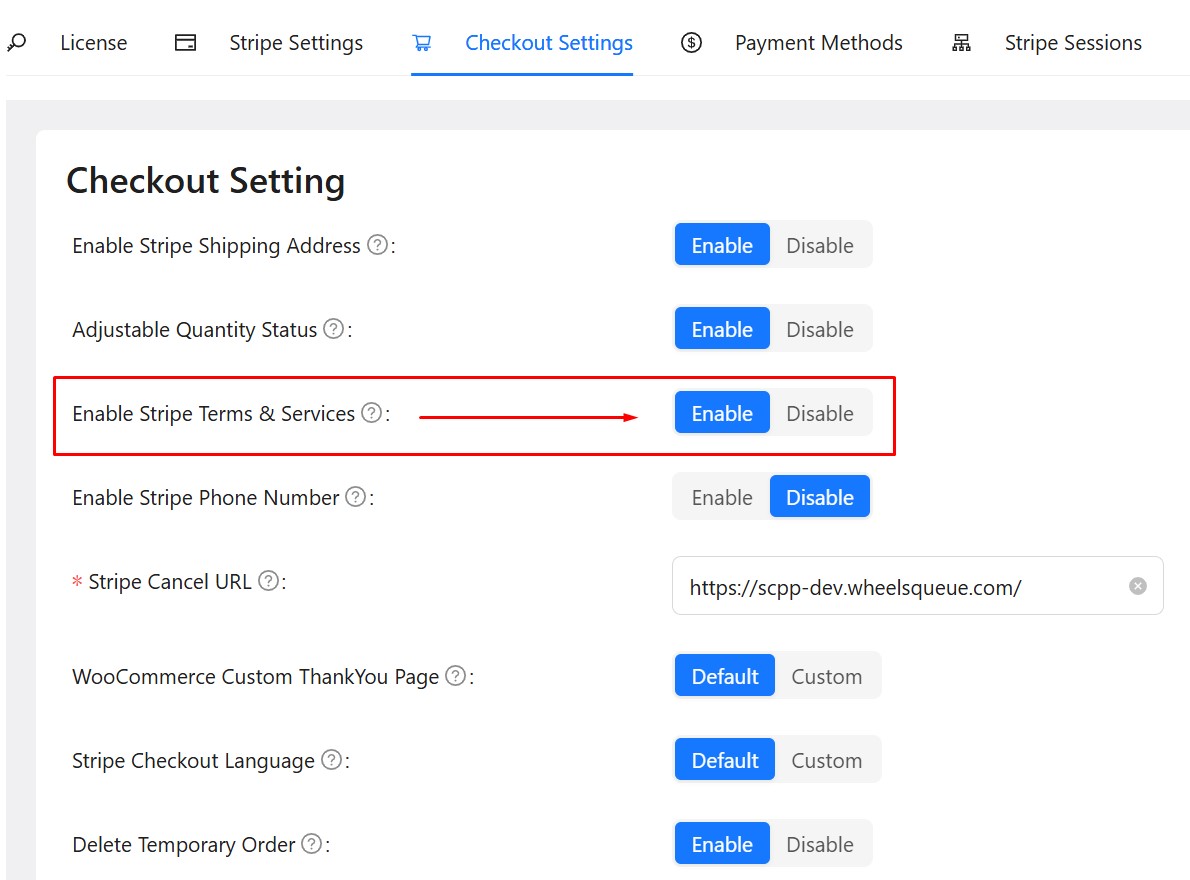
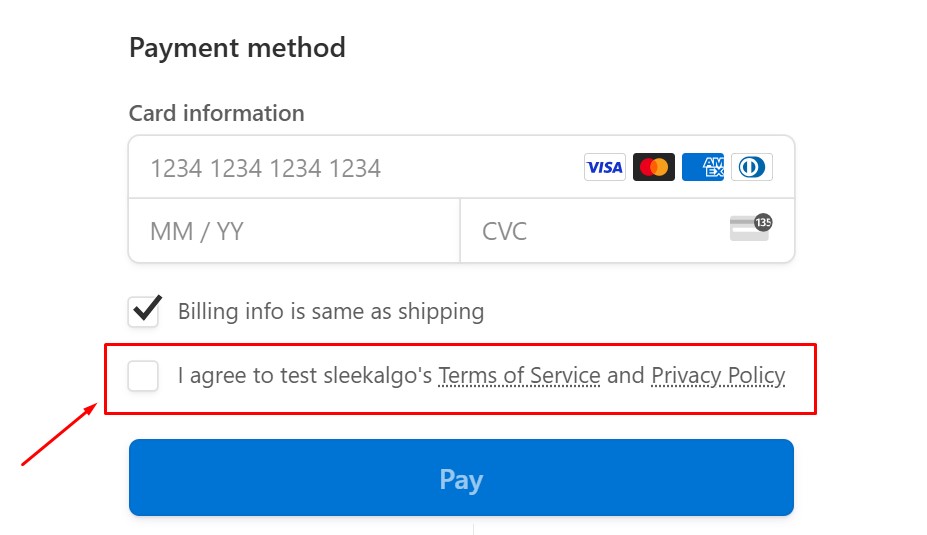
Enable or Disable Terms and Conditions
This option lets you add a Terms and Conditions checkbox to the Stripe checkout page, requiring customers to agree to your terms before proceeding with their purchase.
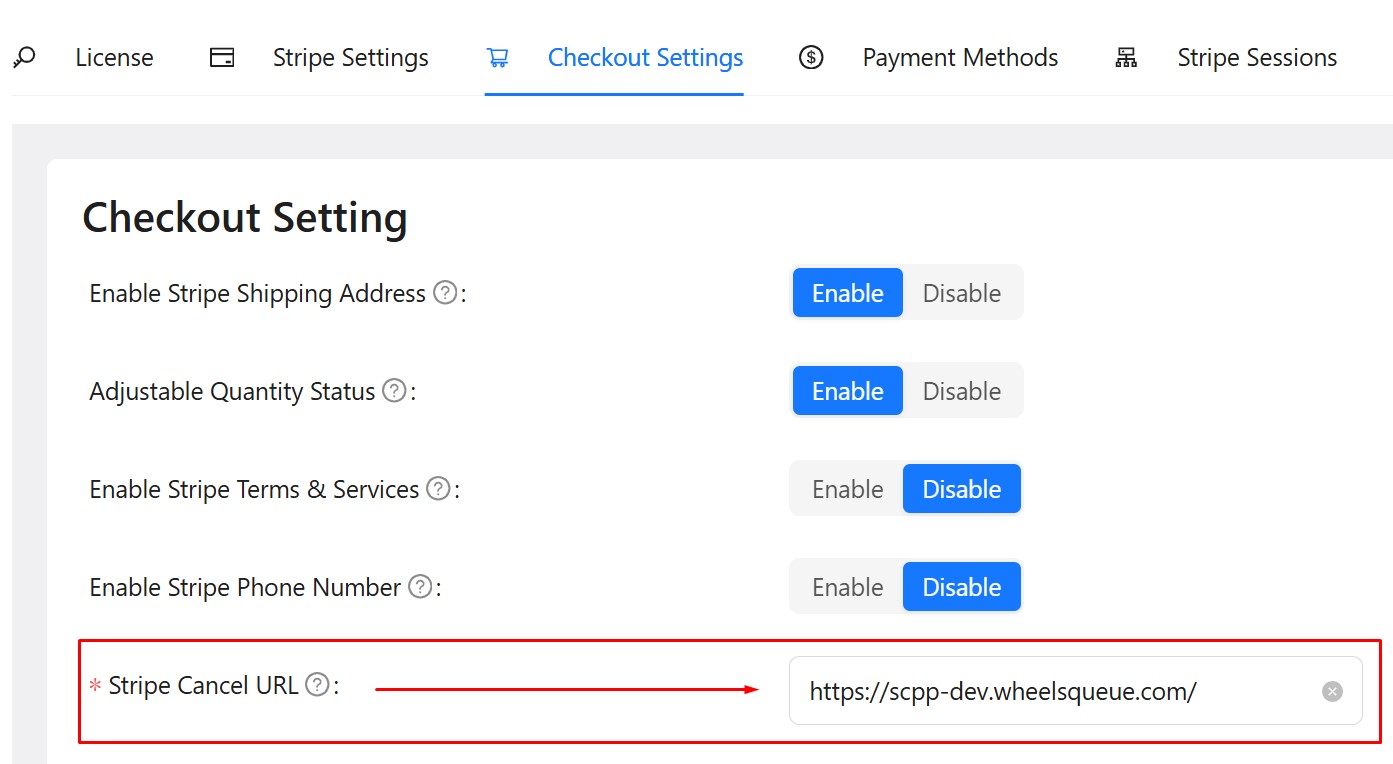
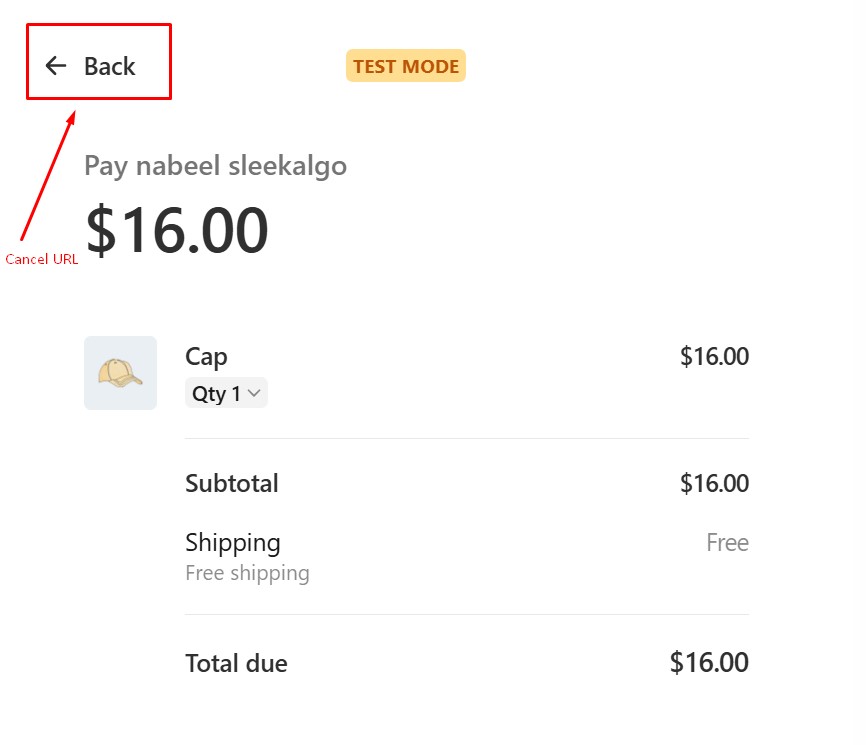
Set a Cancellation URL
Choose where customers return when they go back from Hosted Checkout. Set a custom cancellation URL, or leave it empty to return them to the WooCommerce cart. This setting applies to Hosted Checkout.
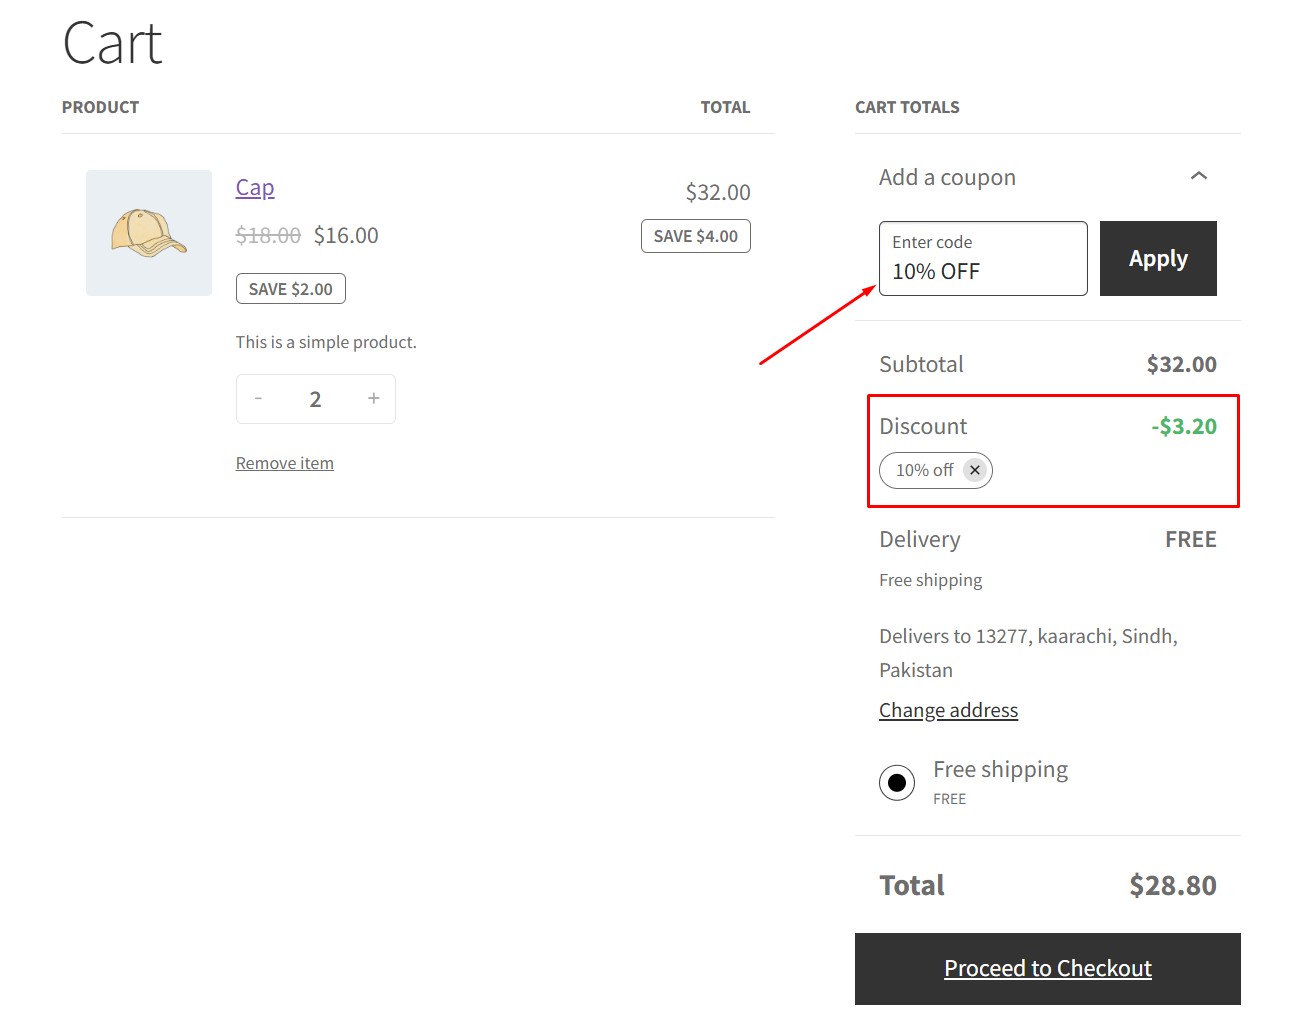
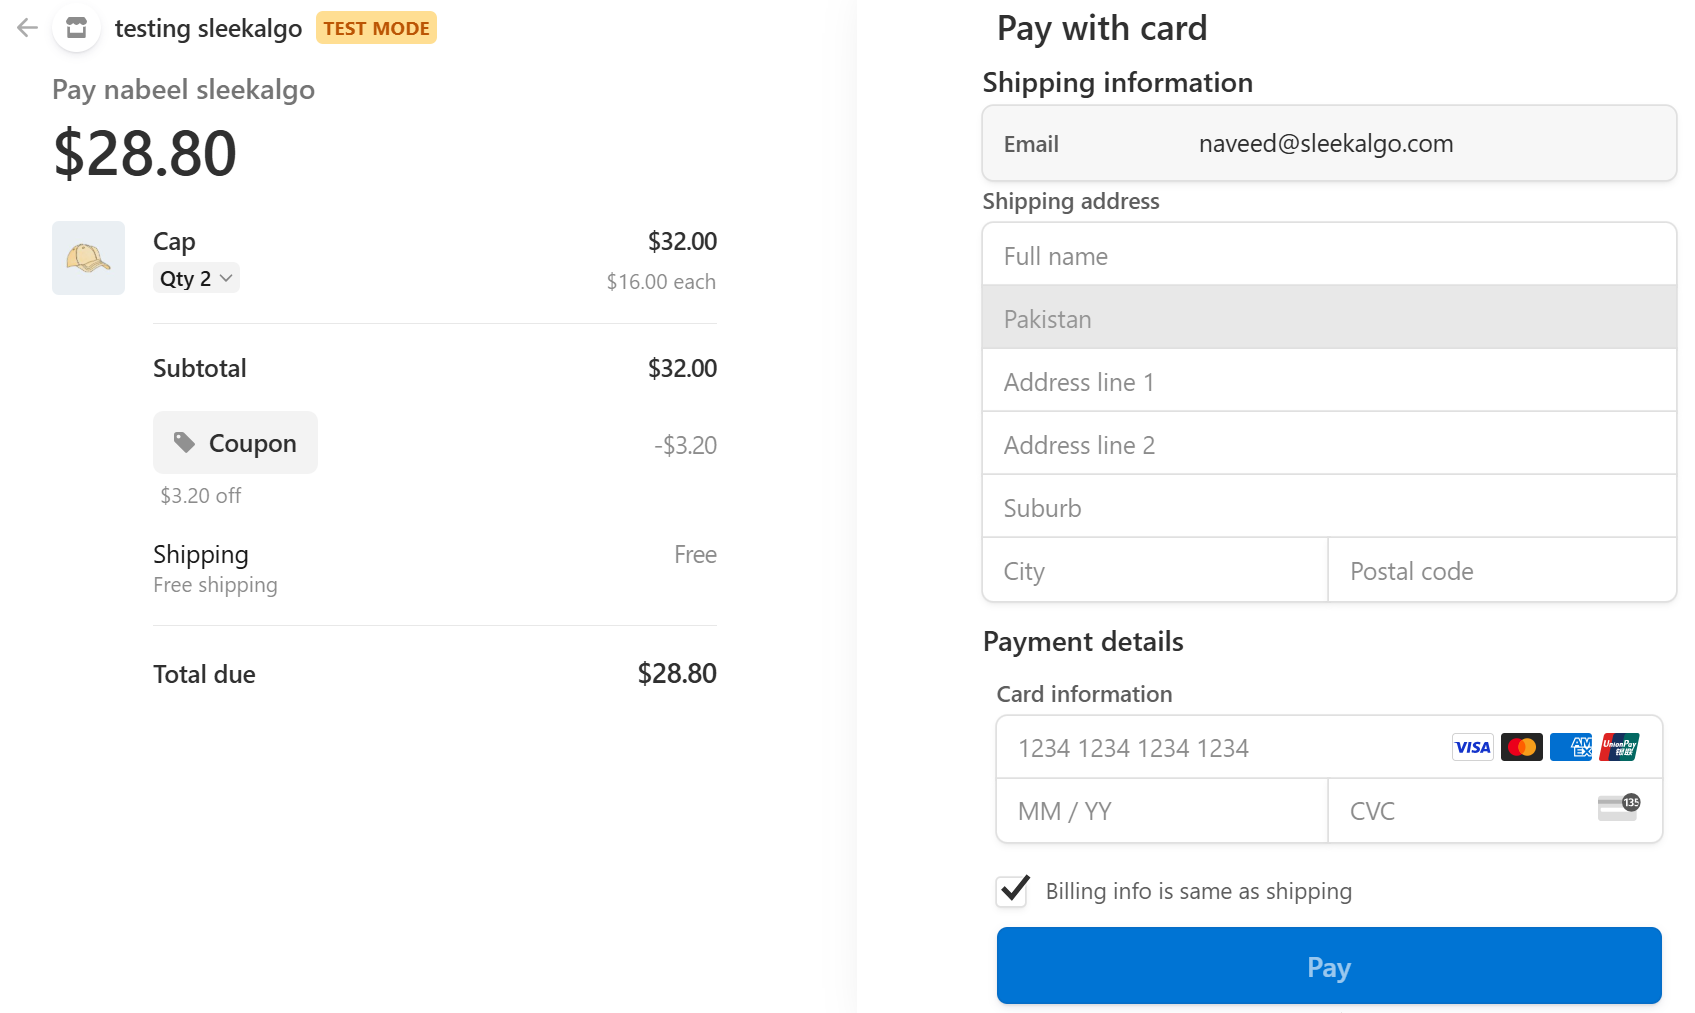
Support for WooCommerce Coupon Codes and Discounts
Let customers apply WooCommerce coupons in the cart and carry eligible discounts into Stripe Checkout. Included in the free version, with WooCommerce coupon rules and usage limits preserved.
Support for Custom Payment Methods
Offer cards and eligible local payment methods, including Link, Klarna, iDEAL, SEPA Direct Debit and supported bank payments. Payment-method selection is free. Availability depends on your Stripe account, country, currency and order.
Choose Stripe Checkout Language
Use the customer’s browser language or choose a supported Stripe Checkout language in the plugin settings. Language selection is included in the free version.
Adjustable Quantity on Stripe Checkout
Let customers adjust eligible product quantities in Stripe Checkout. This free option is disabled by default and includes quantity limits and stock reservations. Existing discounts, shipping, fees and taxes stay fixed; a working webhook is required.

Add Custom Fields to Stripe Checkout
Collect additional order information with text, number or dropdown fields. Set labels and choose whether each field is required or optional.
Stripe Checkout Sessions Information
Review the Stripe Checkout sessions recorded by this plugin, including payment status and customer and order details.
Custom Shipping Text on Stripe Checkout
Show a custom message after the shipping-address fields when shipping-address collection is enabled.
Custom Thank You Page
Choose a custom WordPress page to display after a verified successful payment. Use the order-details shortcode to include the customer’s order information.
Custom Terms and Services Text
Customize the text shown with the Stripe Checkout terms and conditions checkbox. Enable the checkbox to display your custom wording.
Custom Text Before and After Submit Button
Add custom messages before and after the Stripe Checkout submit button, such as payment instructions or order-processing information.
Administrator Test Mode
Let logged-in administrators test checkout with Stripe test payments while regular customers use your store’s live payment mode. Standard test mode for all customers is also available in the free version.
Premium Support by Sleek Algo Technical Team
Get priority email support from the SleekAlgo technical team for plugin setup, troubleshooting and questions about supported features.
14 Days Money Back Guarantee
Sleek Algo provides 14 days money back guarantee on all their premium products. If any of the functionality promised by the plugin does not work well on your particular web store and our technical support team is unable to fix the issue for you, we will be happy to give you a complete refund with no questions asked.
Pricing
Add advanced customization and priority support with Premium.
Secure checkout by Freemius Inc (US)

14 Days Money Back Guarantee
No Questions Asked

Reviews of SleekAlgo Products

Secure Checkout by Freemius
Secure HTTPS

PCI Compliant Checkout
Freemius Hosted

SA Integration for Stripe Checkout and WooCommerce FAQ
Supported cart and mini-cart checkout buttons take customers directly to Stripe Checkout, so they do not complete a WooCommerce checkout form first. Choose Hosted, Embedded Page or Embedded Popup. The Stripe gateway also supports existing order-payment links and classic-checkout integrations. Orders requiring no payment use WooCommerce. Test custom theme buttons and third-party checkout integrations before going live.
Start in Stripe test mode. Save the API key and webhook signing secret for the same Stripe account and environment, then enable the plugin. Embedded Checkout also requires the matching publishable key. Follow the installation guide below and verify a test payment before using live mode.
Yes. The free version includes payment-method selection. Choose Cards or a custom set of supported methods in Payment Methods, and enable them in your Stripe account. Availability depends on your account, country, currency and order. Delayed-payment methods require a working webhook.
The free version includes all three checkout experiences and branding controls for the display name, colors, font and border style. Hosted Checkout also supports a custom logo. Premium adds custom text and text, number and dropdown fields.
Premium includes a Stripe Sessions screen for reviewing sessions recorded by this plugin, including open, completed and expired sessions, with their associated customer and order details.
Free 1.2.0 includes Setup & health. Review saved configuration, run a read-only Stripe connection check and view recent verified Checkout webhook delivery for the selected test or live environment. These checks do not replace a successful test payment or verify every payment method. A redacted support report helps with troubleshooting.
Yes. In Free 1.2.0, open an eligible order paid through this plugin and use its Stripe refunds panel. Verify the original payment, enter an amount or choose the remaining amount, then review and confirm. WooCommerce records the refund after Stripe confirms success. Refunds are amount-only: products are not restocked and product, fee, shipping and tax allocations are unchanged. Pending or review warnings must be resolved before requesting another refund.
Yes. Managed Payments is available in the free plugin for eligible one-time digital products, including supported product variations. Products must also be marked virtual in WooCommerce. Enable it in an eligible Stripe account, then opt products in and choose their digital-product tax category in WooCommerce. Hosted Checkout, Embedded Page and Embedded Popup are supported. Check Stripe’s country, business and product eligibility rules before enabling it.
This integration keeps quantities fixed in Stripe Checkout and does not support subscriptions or physical goods through Managed Payments. Stripe controls its payment methods and checkout defaults; the plugin’s standard Checkout branding, language, optional phone and terms settings do not carry over to this mode.
By default, the plugin blocks Managed Payments checkout if the whole cart is not eligible, including carts with physical goods, shipping or additional fees. You can explicitly enable whole-cart fallback to standard Stripe Checkout instead. The order is never split between payment models, and a failed Managed Payments request does not silently switch to standard Checkout.
With standard Checkout, your business remains the merchant of record. With Managed Payments, tax coverage still depends on location: you remain responsible where Stripe does not handle compliance. Review Stripe’s tax-coverage rules and test your store’s cart scenarios before going live.
Setup Video
Installation and User Guides
Install the free plugin, connect a Stripe test account and verify checkout before accepting live payments. The screenshots show the Free edition; API keys are hidden for security.
1. Install and activate the plugin
In WordPress, open Plugins → Add New Plugin, search for SA Integration for Stripe Checkout and WooCommerce, then select Install Now → Activate. You can also download the ZIP from WordPress.org and use Upload Plugin.
WooCommerce must be installed and active. The plugin requires WordPress 6.3 or later and PHP 7.4 or later. Use supported, up-to-date versions on a public store, with HTTPS enabled. The free edition does not require a license key. Premium users activate their purchased license separately.
2. Connect the matching Stripe environment
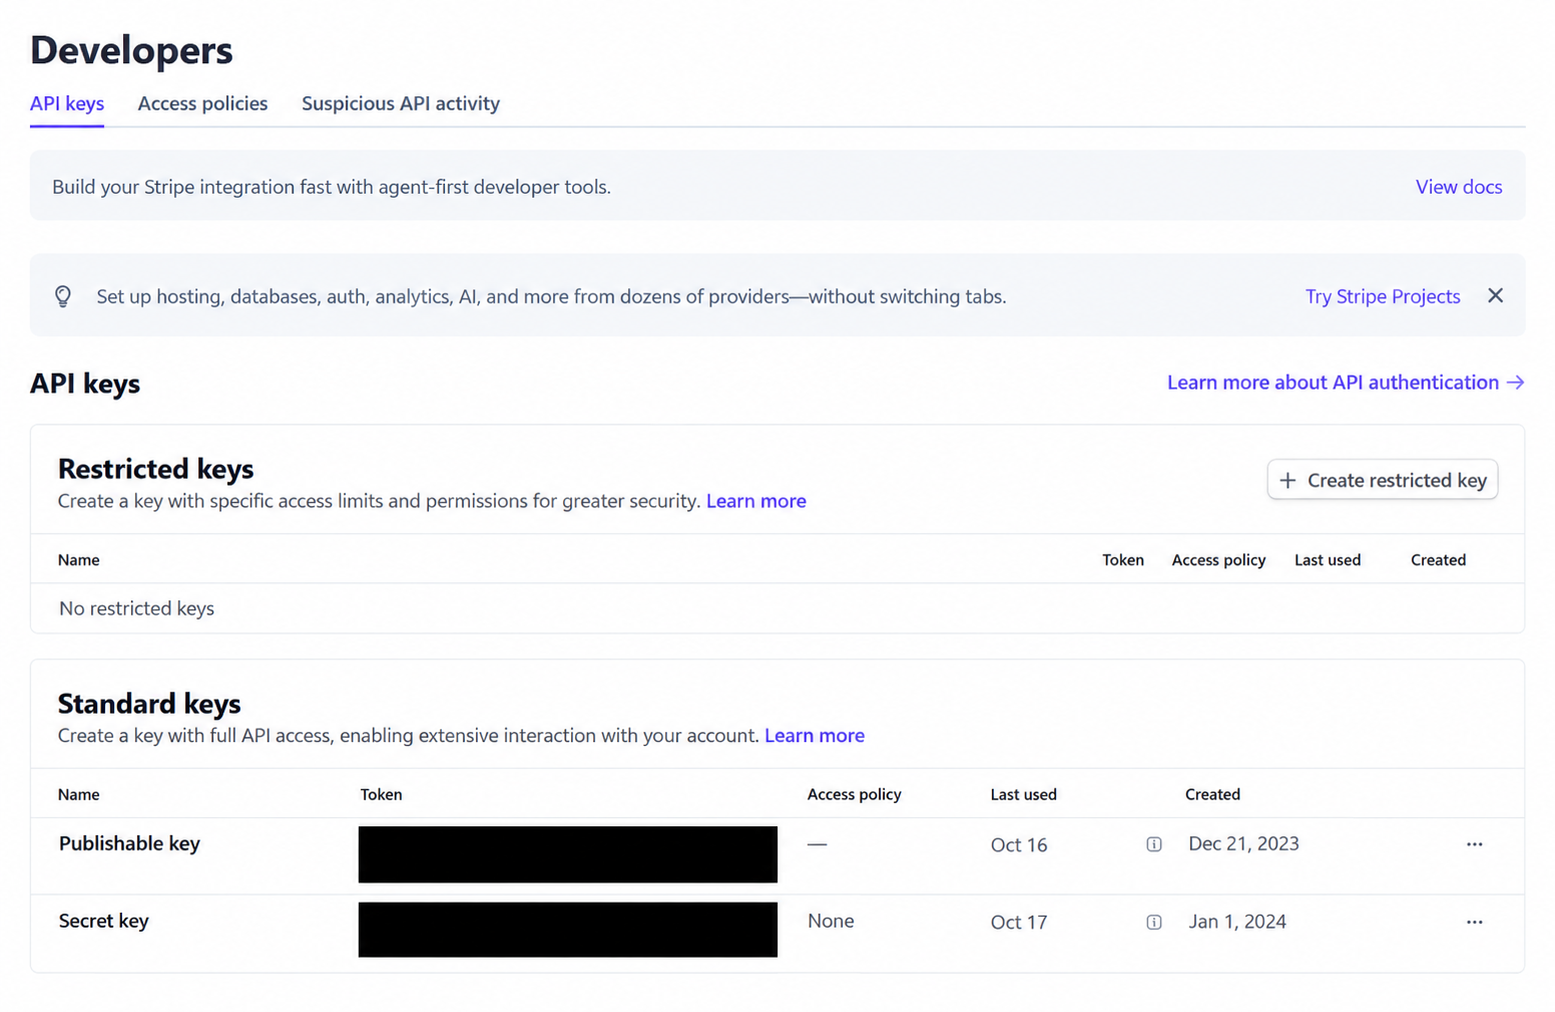
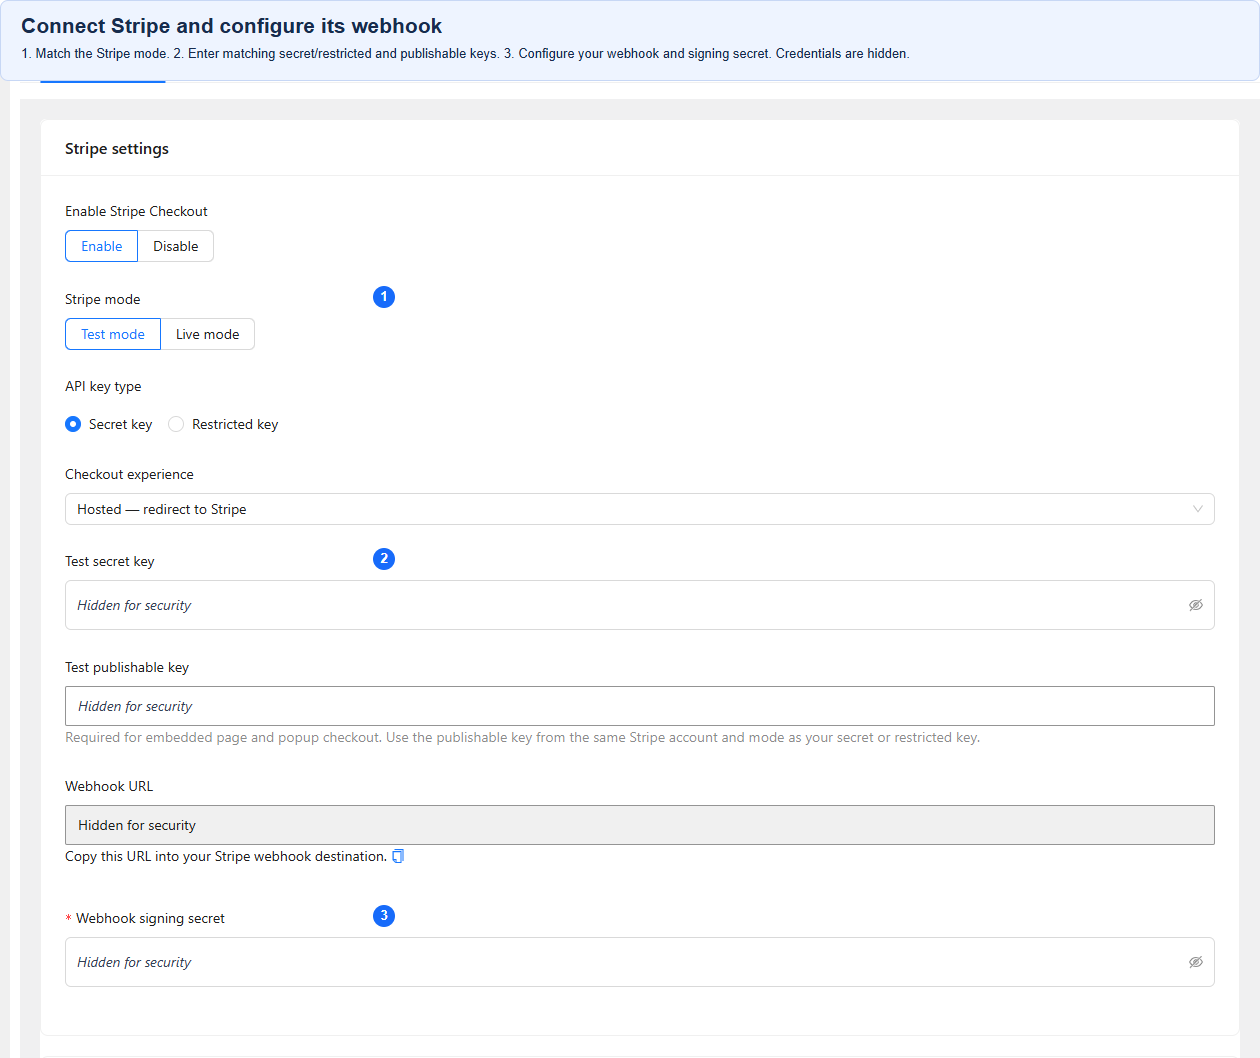
Open WooCommerce → SA Integration → Stripe Settings. Choose Test mode first. In the Stripe Dashboard, select the test or sandbox account you will use, then open its API keys section.
For a standard-key connection, copy the Secret key from Stripe into the plugin’s secret-key field for the selected mode. Embedded Page and Embedded Popup also need the Publishable key from that same account and environment. Never paste a secret key into the publishable-key field. If you choose a restricted-key connection instead, use a restricted key with the permissions required by this integration.
3. Set up Stripe webhooks
Step 1: Open webhook setup. In Stripe, select the same test, sandbox or live environment as your plugin keys. Open Workbench → Webhooks → Create an event destination. Choose Your account and the Snapshot payload format. This plugin needs Snapshot events, not Thin events.
Step 2: Select the Checkout events. Expand Checkout and select checkout.session.completed, checkout.session.async_payment_succeeded and checkout.session.async_payment_failed.
For refund synchronization in Free 1.2.0, also select refund.created, refund.updated and refund.failed. Then click Continue. Existing webhook destinations can be edited to add these refund events; do not replace a working endpoint unnecessarily.
Step 3: Choose the destination type. Select Webhook endpoint, then click Continue.
Step 4: Enter the correct endpoint. Give the destination a descriptive name. In WordPress, open the plugin’s Stripe Settings and copy the value shown in Webhook URL. Paste that value into Stripe’s Endpoint URL field. Do not copy the WordPress admin address from your browser. The endpoint ends with /wp-json/sahcfwc/v1/webhooks/stripe-listener and must use your store’s publicly reachable HTTPS address.
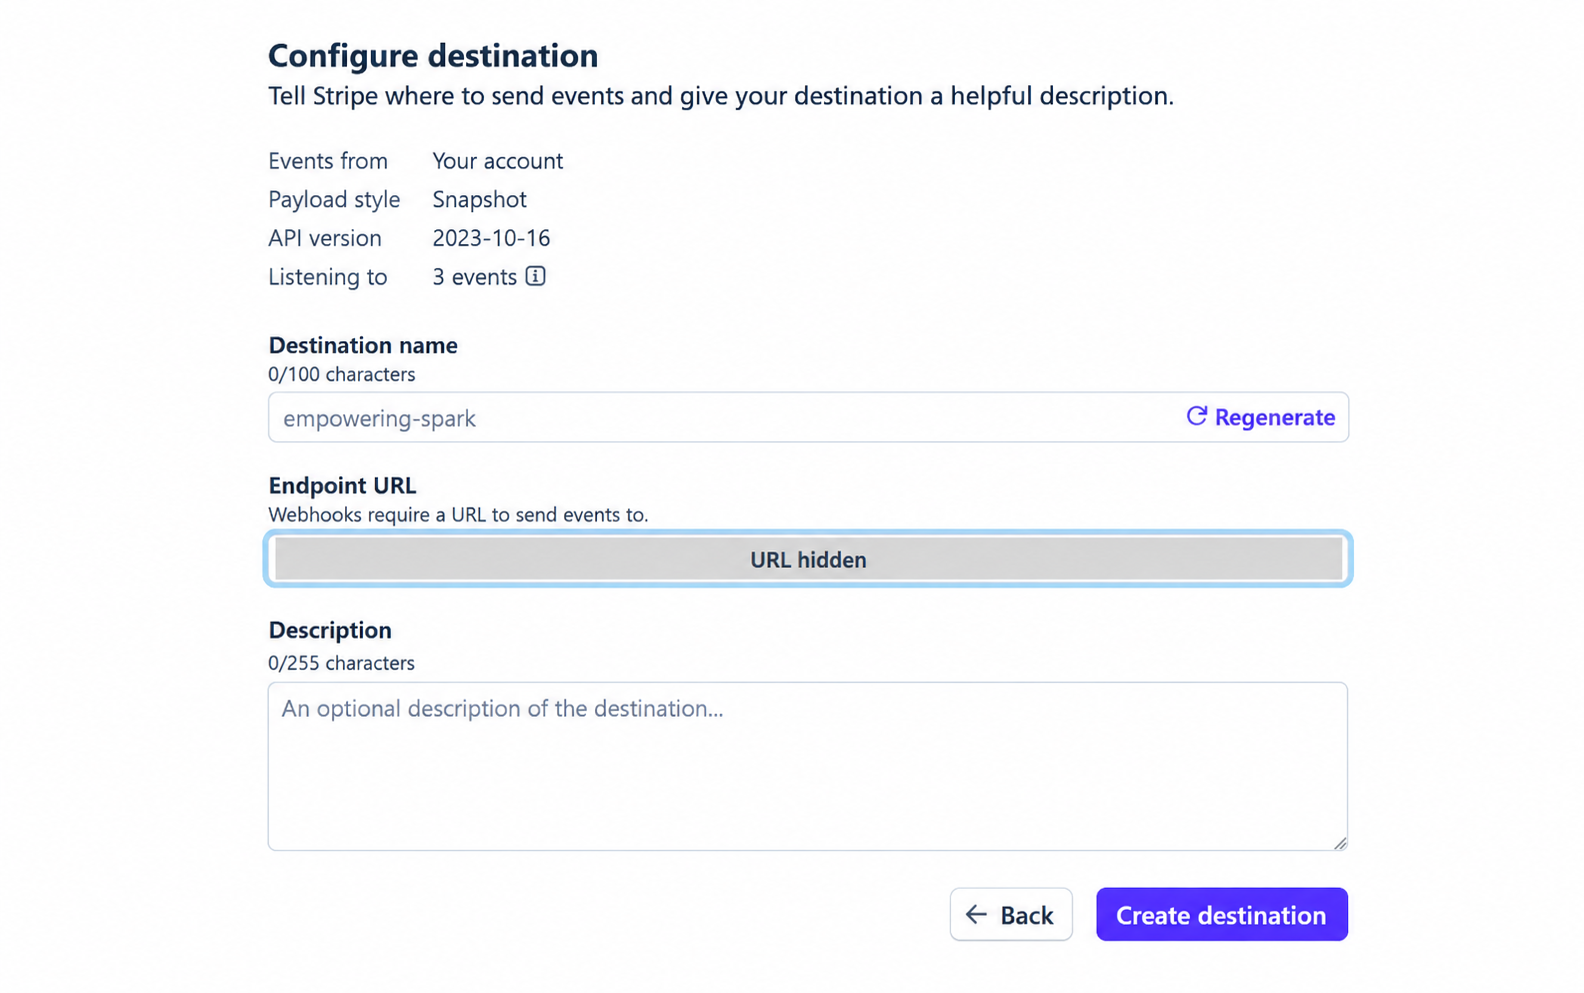
Step 5: Save the signing secret. Click Create destination. Open the destination details, reveal its signing secret privately, and paste it into the plugin’s webhook signing-secret field for the same environment. Save the plugin settings. The signing secret is not an API key; keep both private.
Step 6: Verify delivery. Complete a sandbox checkout, then inspect the destination’s event deliveries in Stripe. Confirm a successful 2xx response and the expected WooCommerce payment status. In Free 1.2.0, also test a refund on an eligible sandbox order and verify its refund-event delivery and WooCommerce record. The Setup & health indicator covers Checkout events, not refund events. A browser redirect alone does not verify webhook delivery.
For a local WordPress installation, Stripe cannot deliver directly to localhost or 127.0.0.1. Use the Stripe CLI or a secure HTTPS tunnel for local testing. Keep webhooks enabled for order updates, delayed payments and quantity reconciliation.
4. Choose the checkout experience and enable it
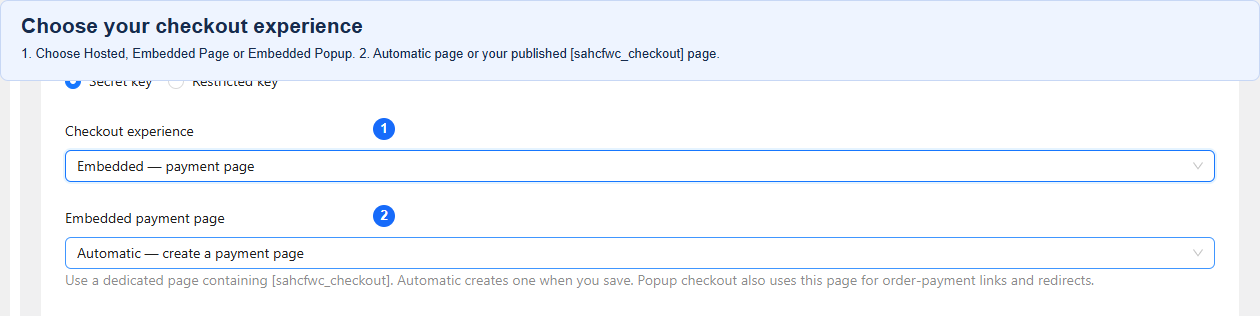
Select Hosted, Embedded Page or Embedded Popup in Stripe Settings. For Embedded modes, save settings to create the automatic secure payment page, or select a published page containing [sahcfwc_checkout]. Exclude checkout and payment pages from page caches.
Enable the plugin and save settings. Also enable its gateway under WooCommerce → Settings → Payments if you use existing order-payment links or classic gateway integrations. Keep API keys, publishable keys and webhook signing secrets matched to the selected environment.
5. Test before switching to live payments
In Free 1.2.0, open Setup & health after saving your settings. Use Refresh checks to review local configuration, then Check Stripe connection for a read-only account check. Address warnings and continue with a real sandbox checkout below; passing the checklist alone does not establish payment readiness.
Add products to the cart and use its checkout button. Confirm the selected Stripe experience opens without a WooCommerce billing form first. Test coupons, shipping, tax, quantity settings, successful and declined payments, cancellation and webhook delivery. Check the resulting order and stock in WooCommerce.
After testing, configure the live API credentials, matching publishable key where needed, and a live webhook destination with its own signing secret. Switch to Live mode only when setup and verification are complete. Test custom themes and third-party checkout integrations on staging first.
Complete the Installation guide first to connect Stripe and verify your webhook. Then follow this guide through Stripe Settings, Checkout Settings and Payment Methods. All settings below are free unless marked Premium. Save each tab before switching to another tab, wait for the confirmation, and start a new checkout session to test your changes.
Check setup and webhook health (Free 1.2.0)
Open WooCommerce → SA Integration → Setup & health after saving your settings. Refresh checks reads saved configuration and cached results without contacting Stripe. Check Stripe connection makes an explicit read-only account request; it does not create a payment, verify every restricted-key permission or prove wallet availability.
The webhook indicator shows recent signature-verified Checkout delivery for the matching settings and test/live environment. Delivery is not proof that an order was paid, and sandbox events do not verify live delivery. Confirm a sandbox payment and check refund events separately. Use Copy support report for diagnostics without API keys, signing secrets, site addresses or customer/order details; review it before sharing.
Choose Hosted, Embedded Page or Embedded Popup
Hosted: customers pay on Stripe’s hosted checkout page. Embedded Page: Stripe Checkout appears on a payment page within your store. Embedded Popup: Stripe Checkout opens in a popup over your store. Hosted remains the default for existing installations.
Embedded modes require a matching publishable key and a published secure payment page. Save settings to create the automatic page or choose your own page containing [sahcfwc_checkout]. A popup can be closed and reopened without cancelling the payment attempt. Some payment methods redirect to a bank or payment provider for authorization.
Customize checkout branding
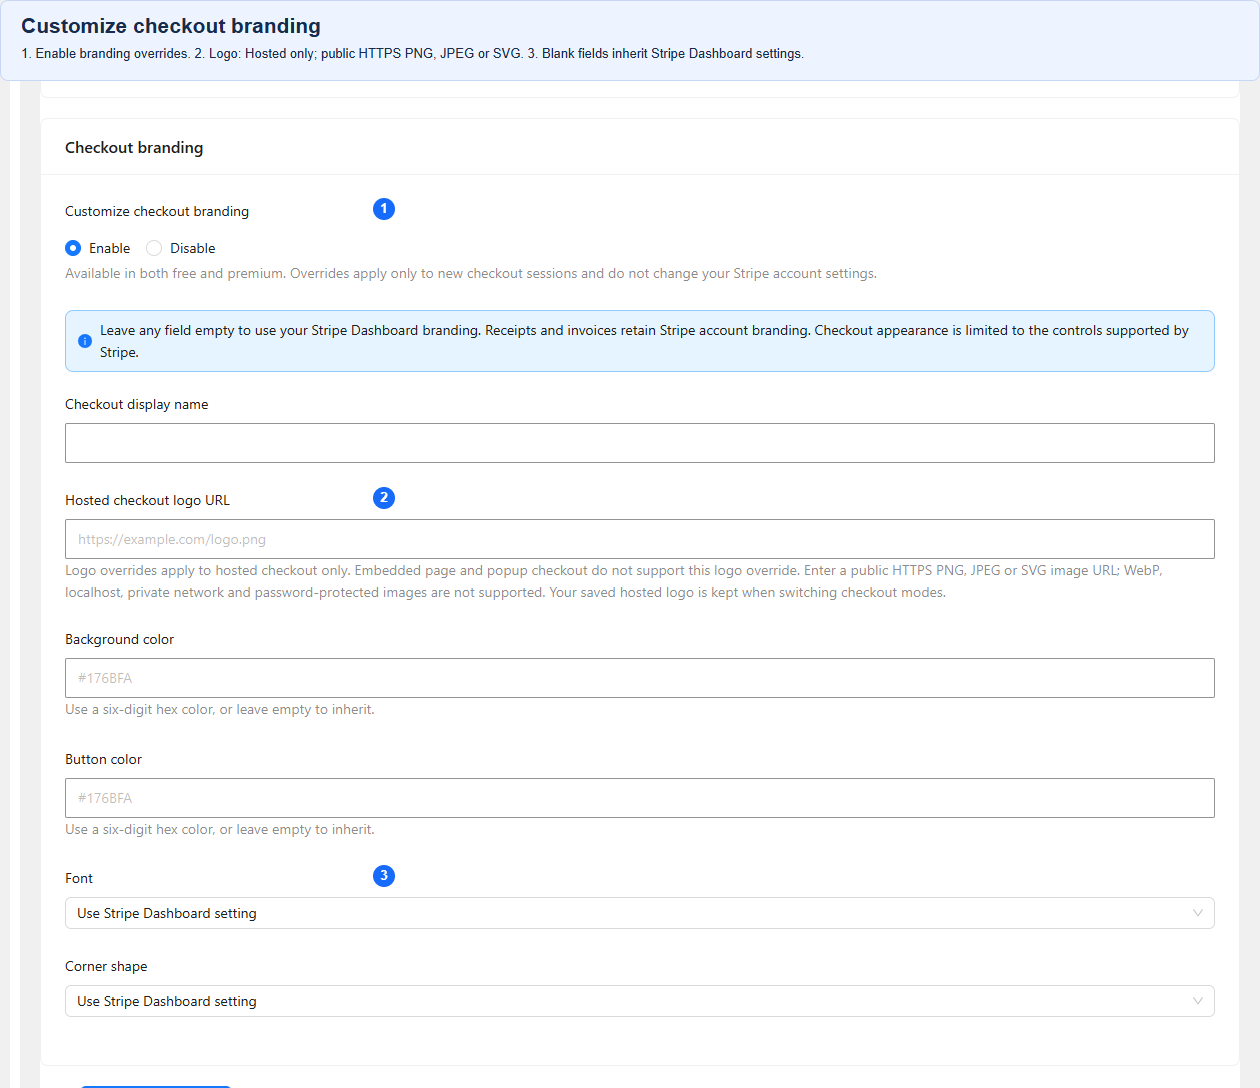
In Stripe Settings, enable Customize checkout branding. Set the display name, background and button colors, Font and Corner shape. Leave a text or color field empty, or select Use Stripe Dashboard setting in the dropdowns, to inherit that setting. Keeping an existing override unchanged does not restore the Dashboard default. Disable branding overrides to use Dashboard defaults for new sessions.
Hosted Checkout also supports a custom logo from a public HTTPS PNG, JPEG or SVG image URL. Stripe does not support this logo override in Embedded Checkout. These settings do not change your legal business name, and store CSS cannot restyle the protected payment fields inside Stripe’s iframe. Click Save Stripe settings before moving to Checkout Settings.
Configure addresses, phone numbers and terms
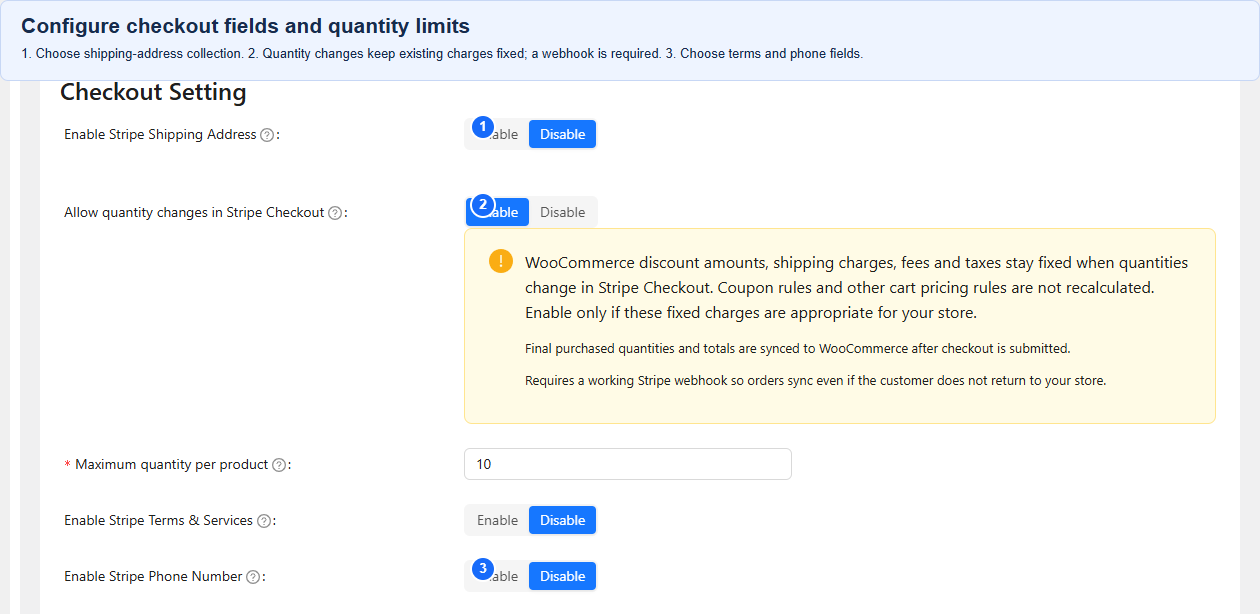
In Checkout Settings, choose whether to collect a shipping address and phone number, and whether customers must accept your terms and conditions. Configure your relevant policies in Stripe. Custom wording for the terms checkbox is Premium; enabling the checkbox is free.
Use the WooCommerce cart to apply coupons and calculate shipping, fees and taxes before payment. Stripe receives the saved order’s amounts. Changing an address in Stripe Checkout does not run WooCommerce shipping, tax or coupon rules again. Check your store’s location-dependent charges before enabling live payments.
Allow product quantity changes when appropriate
Quantity changes are optional and disabled by default. If you enable them, set Maximum quantity per product to a suitable limit. Eligible products can be adjusted within the allowed quantity and stock limits. For stock-managed products, the allowed maximum is reserved while checkout remains open, not just the starting cart quantity. Existing discounts, shipping, fees and taxes remain fixed; WooCommerce cart pricing rules are not recalculated inside Stripe Checkout.
A working webhook is required. Verified final quantities and totals are synchronized to WooCommerce after checkout is submitted, and fulfillment waits for confirmed payment. Leave this option disabled if your shipping or discounts depend on the final quantity and must be recalculated.
Set language and cancellation behavior
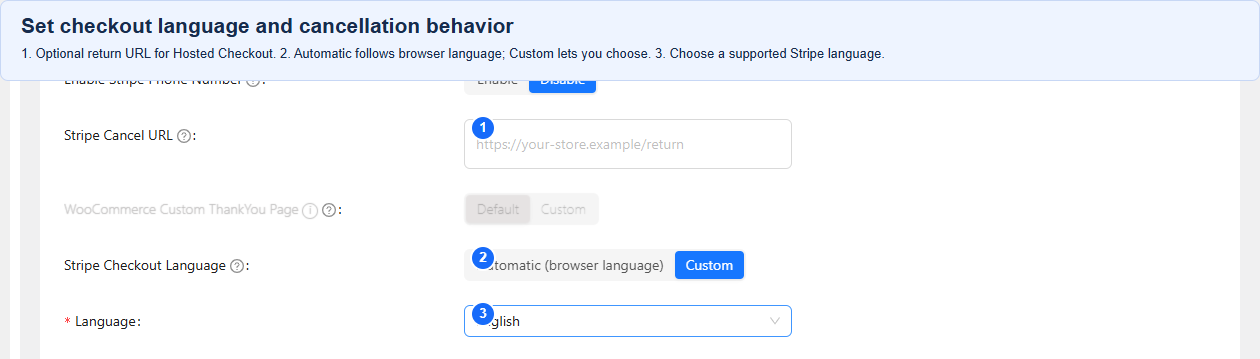
Use the customer’s browser language or choose a supported Stripe Checkout language. Set an optional cancellation URL for Hosted Checkout, or leave it empty to return customers to the cart. The cancellation URL does not control closing an Embedded popup.
The Delete Temporary Order option can move an eligible unpaid order to the trash after cancellation is verified. It does not delete paid orders simply because a customer closes checkout. Disable it if you prefer to retain cancelled orders in your order list. When you finish configuring this tab, click Submit to save your Checkout Settings before moving to Payment Methods.
Select cards and local payment methods
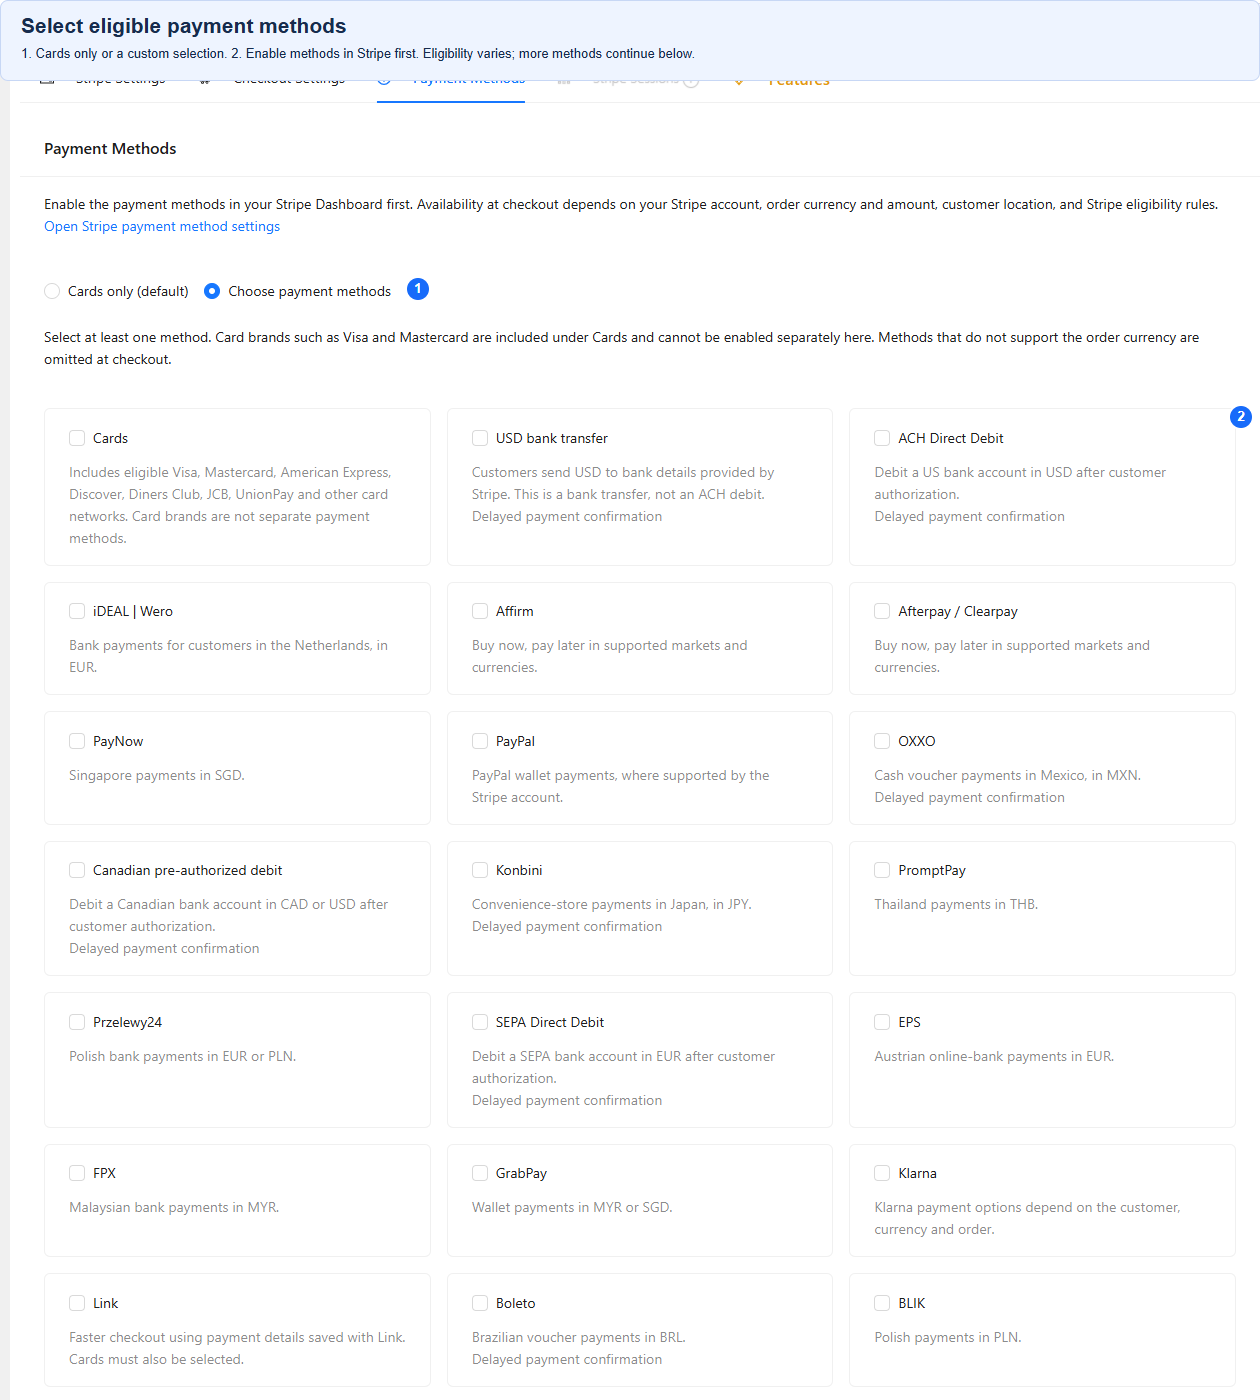
In Payment Methods, select Cards only (default) or Choose payment methods. For a custom selection, choose at least one supported method and complete any additional fields shown. Enable the corresponding methods in Stripe, then click Save payment methods. The methods actually shown depend on your Stripe account, country, currency, order and checkout mode. Not every listed method is available to every store or transaction.
Delayed-payment methods may leave an order awaiting payment until Stripe sends a verified success or failure event. Do not fulfill an order merely because checkout was submitted. Verify your webhook configuration before offering these methods.
Apply WooCommerce coupons in the cart
First open WooCommerce → Settings → General, select Enable the use of coupon codes and save changes. The plugin does not enable this automatically. Customers enter WooCommerce coupon codes in the cart before opening Stripe Checkout. Eligible discounts are included in the saved order and passed to Stripe, with WooCommerce coupon rules and usage limits preserved. This is not a separate Stripe promotion-code field.
Issue full or partial refunds (Free 1.2.0)
1. Verify the original payment. Open the paid order in WooCommerce → Orders, find Stripe refunds and select Refresh Stripe status. The panel supports eligible payments made through this plugin, using the original account, currency and test/live mode. Keep the original mode’s API credentials available. Older orders without the required payment records may be ineligible.
2. Review and confirm the amount. Enter a partial amount or select Use remaining amount for the available balance. Select Review refund request, check the amount, currency and original payment mode, then confirm. Opening the panel or refreshing status does not issue a refund.
3. Follow the refund status. WooCommerce records a refund only after Stripe confirms success. If a request is pending, unknown or marked Manual review required, refresh its status and resolve the warning before requesting another refund. A refund that fails after an earlier success requires manual accounting review; the plugin does not silently remove the existing WooCommerce refund record.
Amount-only limits: these refunds do not restock products, revoke download access or allocate amounts to product, fee, shipping or tax lines. Do not add another manual WooCommerce refund for the same Stripe refund. Configure and verify the three refund events in the Installation guide for signed status updates.
Optional: Stripe Managed Payments (Free)
1. Check Stripe eligibility and start in a sandbox. Enable Managed Payments in the matching Stripe account and review its country, business and product rules. Keep the API keys and webhook signing secret in the same environment. Embedded experiences also need the matching publishable key.
2. Enable the optional payment model and classify your products. Open the plugin’s Checkout Settings → Managed Payments and confirm eligibility. In each eligible virtual product’s edit screen, enable Managed Payments, select its digital-product tax category and confirm product eligibility. Supported variations can inherit the parent classification or use their own complete settings. Product opt-in is not an approval from Stripe.
3. Choose how to handle ineligible carts. Keep the default blocking policy, or explicitly acknowledge whole-cart standard Checkout fallback. The first integration supports one-time eligible digital products with fixed quantities, not subscriptions, physical goods, shipping or extra fees in Managed Payments. Standard Checkout branding, language, optional phone and terms controls do not apply to Managed Payments; Stripe controls those checkout defaults.
4. Test payment, order totals and refunds. Test the checkout experience you selected, an eligible cart and a mixed cart. Confirm the verified payment and customer-tax amounts in WooCommerce. Stripe/Link supplies payment receipts and tax documents. WooCommerce records customer amounts in the order currency; it does not establish withheld tax, settlement proceeds or your tax liability. Check Stripe’s coverage exceptions and reconcile its reports. Amount-only refunds do not restock products or reallocate order-item taxes.
Premium customization and session tools
Custom fields: add text, number or dropdown fields, label them, and make them required or optional. Stripe supports up to three custom fields per checkout session and up to 200 options per dropdown. Do not request passwords or other sensitive information through these fields.
Custom text: add messages after shipping-address fields, before or after the submit button, and alongside the terms and conditions checkbox. These text controls are Premium.
Custom thank you page: choose a WordPress page and insert the provided order-details shortcode. It is displayed after a verified successful payment.
Stripe Sessions: review sessions recorded by this plugin, including payment and session status, expiry, totals and customer or order details. Use the email and date filters to locate a session. An open or expired session is not evidence of a successful payment.
Administrator Test Mode: let logged-in administrators test with Stripe test payments while customers use live mode. Standard Test mode for everyone is also available in Free.
Troubleshooting and final checks
If checkout cannot start, confirm the plugin is enabled, credentials match the chosen environment, and the selected payment methods support the order. For Embedded modes, also check the publishable key and secure payment page. Keep checkout and payment pages out of full-page caches.
If a payment appears in Stripe but the WooCommerce order has not updated, inspect webhook delivery and the matching signing secret before asking the customer to pay again. Test your theme, cart, order-payment links and any third-party checkout integrations before going live. Orders with no payment due are completed through WooCommerce.